
Your shower drips after you shut it off, the handle grinds, or the water swings hot and cold. The first instinct is that the whole valve behind the wall has to go. Usually it does not. Most shower valve problems are fixed by replacing the cartridge, a single part that slides out the front, and a full valve body swap is only needed when the brass inside the wall is cracked, corroded or obsolete.
How do you replace a shower valve?
Replacing a shower valve means two very different jobs, and the first step is figuring out which one you have.
Job one is a cartridge swap. The cartridge is the removable insert inside the valve that moves when you turn the handle. It controls the flow and mixes hot with cold. You take the handle and the round trim plate off, pull a clip or unscrew a nut, slide the old cartridge out and push a matching new one in. Nothing is cut and nothing is soldered.
Job two is a valve body replacement. The valve body is the brass housing behind the wall that the hot and cold pipes connect to. Replacing it means opening the wall, cutting the old body out of the pipes and connecting a new one. That is real plumbing work with the water shut off to the house.
Here is how the whole thing works in order:
- Shut off the water at the main valve and open a lower faucet to drain the lines.
- Remove the handle, then the trim plate (the round or oval cover against the wall).
- Look at what is behind it: brand, model and whether the cartridge comes out cleanly.
- If the brass body looks sound, replace the cartridge and test.
- If the body is cracked, leaking inside the wall, or the cartridge will not seal, the body has to be replaced from inside the wall or through the tile opening.
Our records point the same way. The shower calls that came in as "replace my shower valve" split between cartridge and stem repairs on one side and full valve replacements on the other. A good share of the full replacements happened after someone had already tried a cartridge and the leak kept going. So start with the cheap fix, but know the signs that it will not be enough.
If you do not know where your main shutoff is, read our guide on finding your main water shutoff valve before you touch anything. Most older homes have no separate shutoff for the shower, so the whole house goes dry while you work.
What is a shower valve, a cartridge and a trim plate?
Three parts make up what you think of as "the shower handle," and knowing which is which tells you how big the job is.
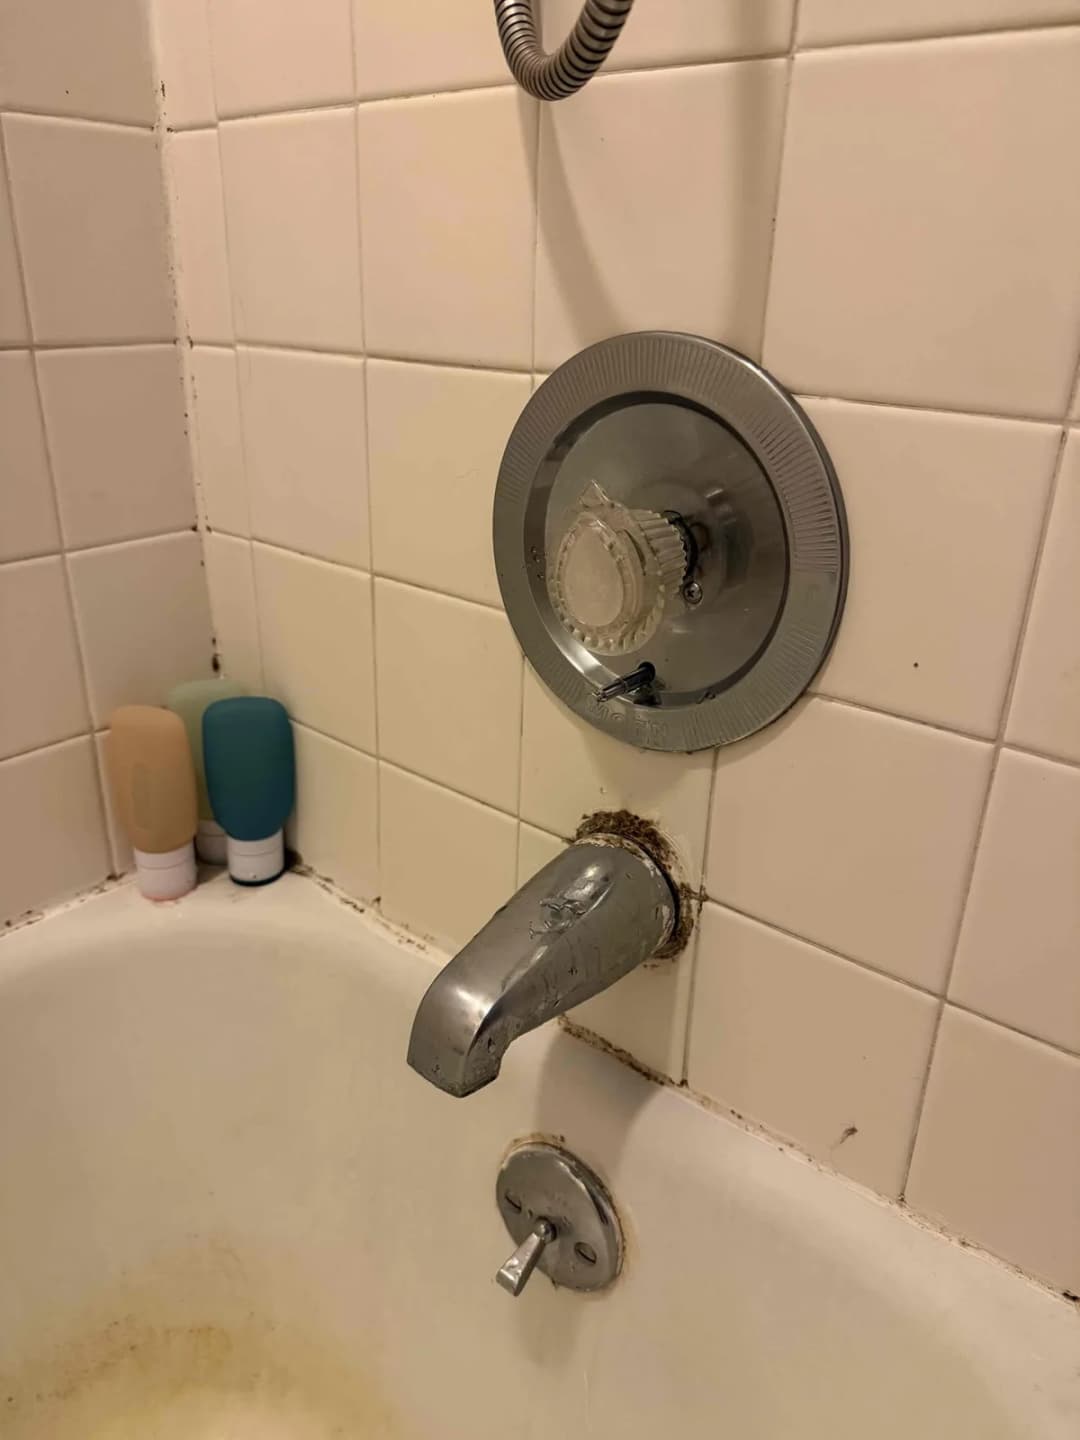
The trim: this is all you see from the bathroom. The handle and the round or oval cover plate behind it. They are decoration and come off with a screwdriver.
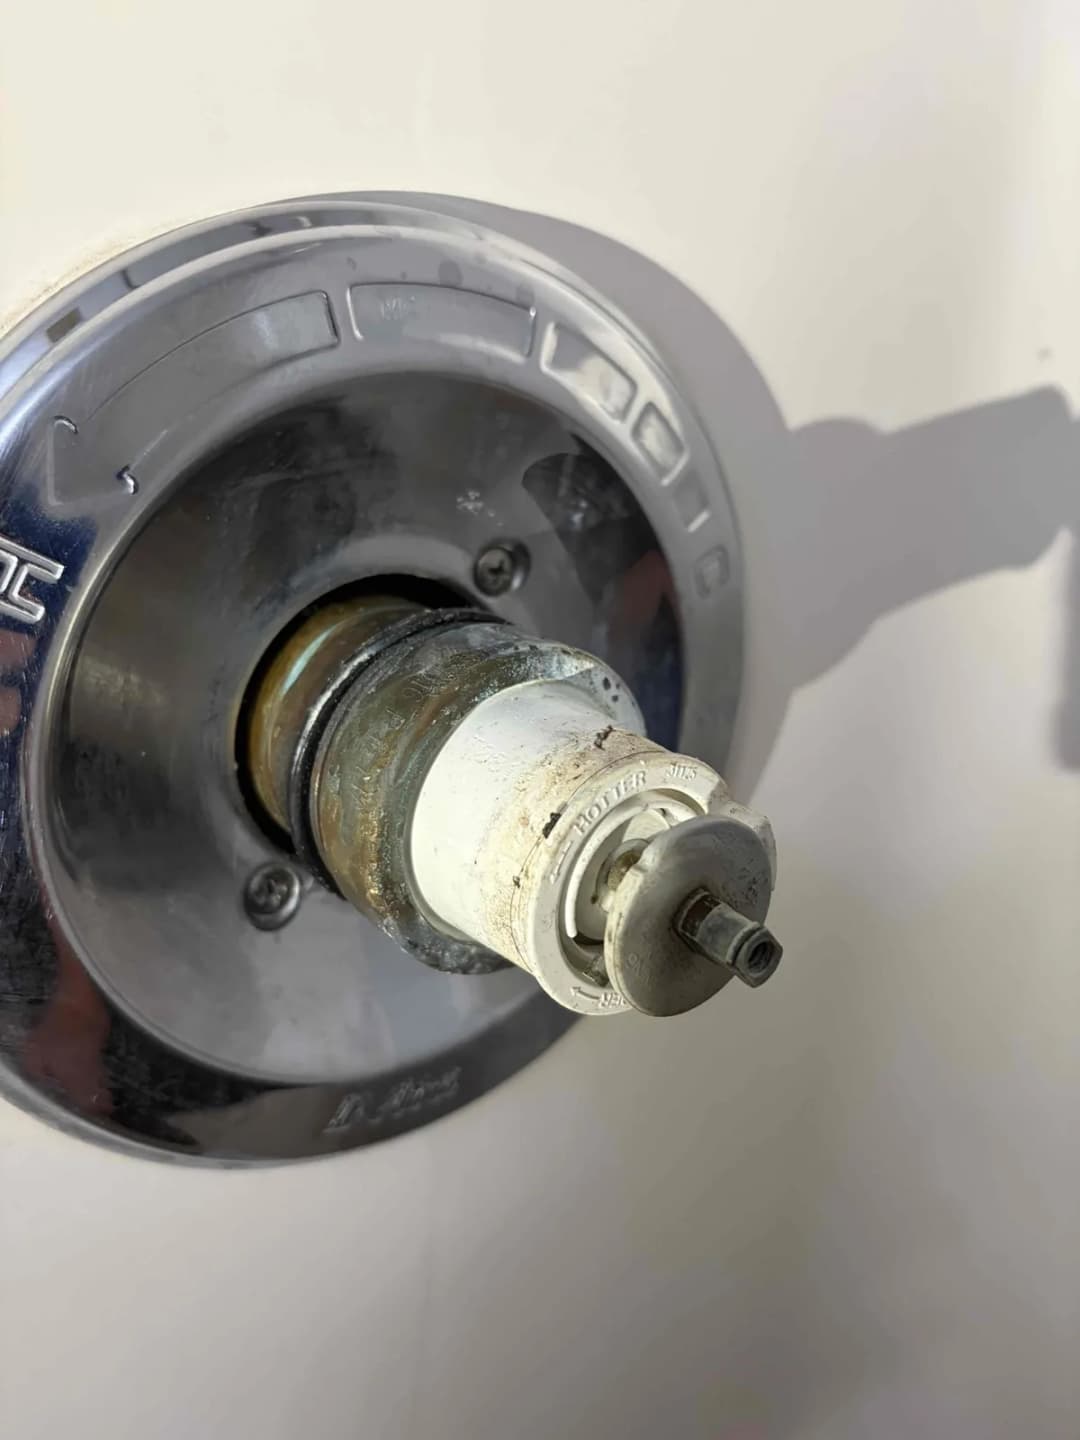
The cartridge: the part that actually wears out. Take the handle off and this is what sticks out of the wall. It is a removable plug that controls flow and temperature, and replacing it is the cheap fix.
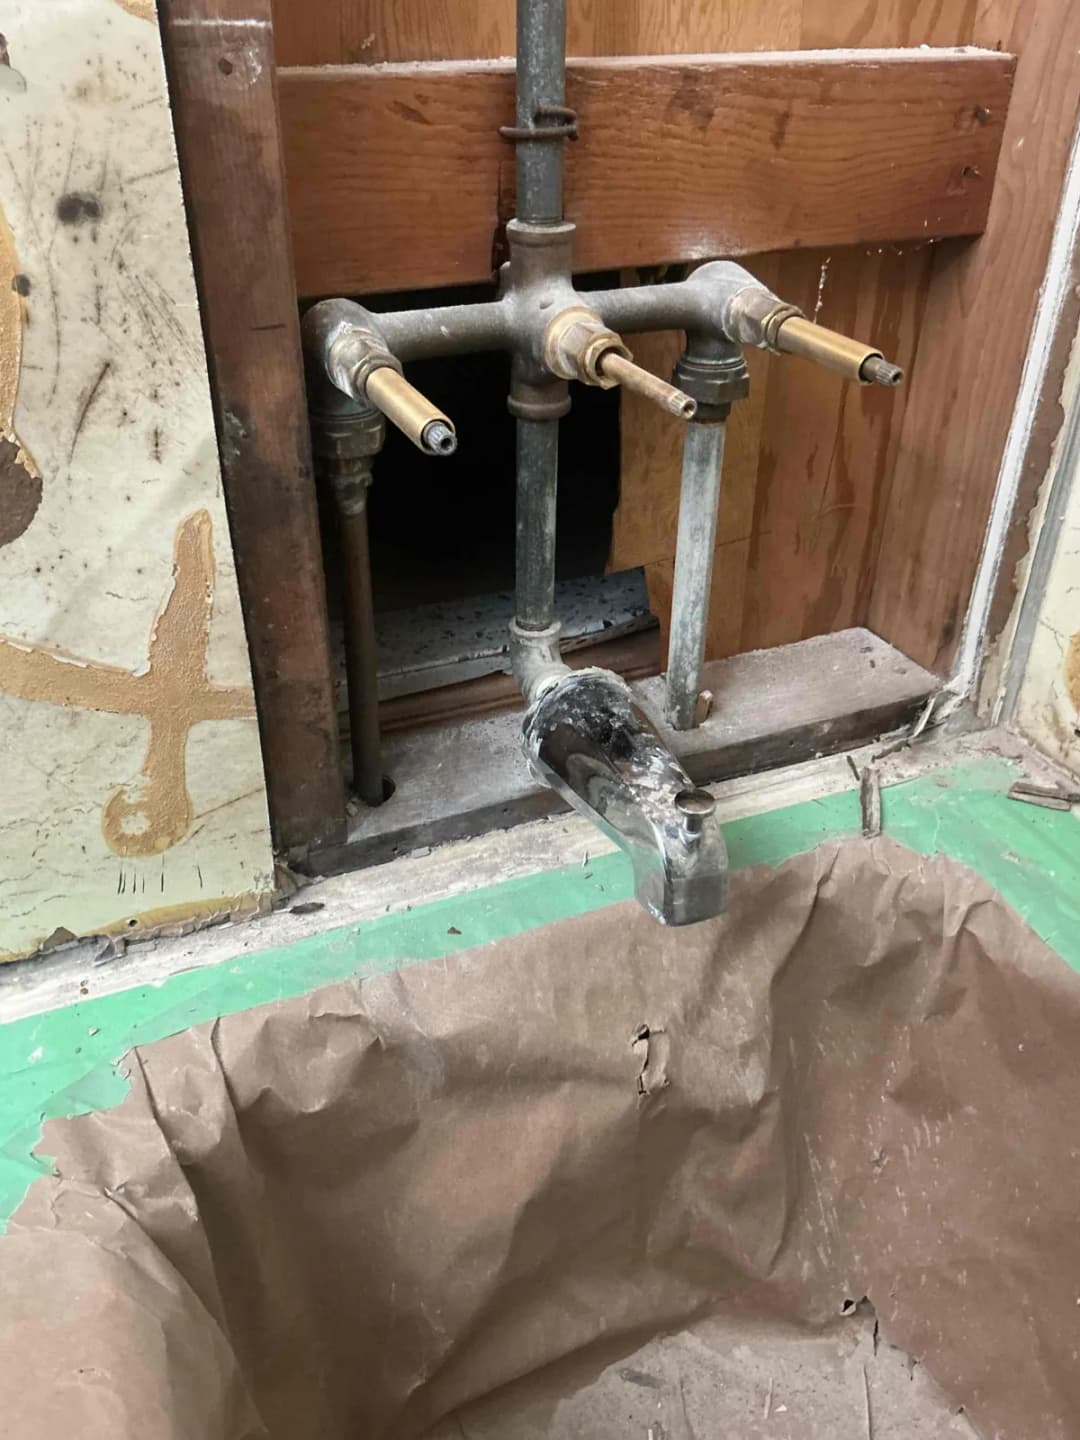
The valve body: the brass housing inside the wall. The pipes connect to it and the cartridge sits inside it. If this is cracked or leaking, it has to be replaced from inside the wall, which is a much bigger job.
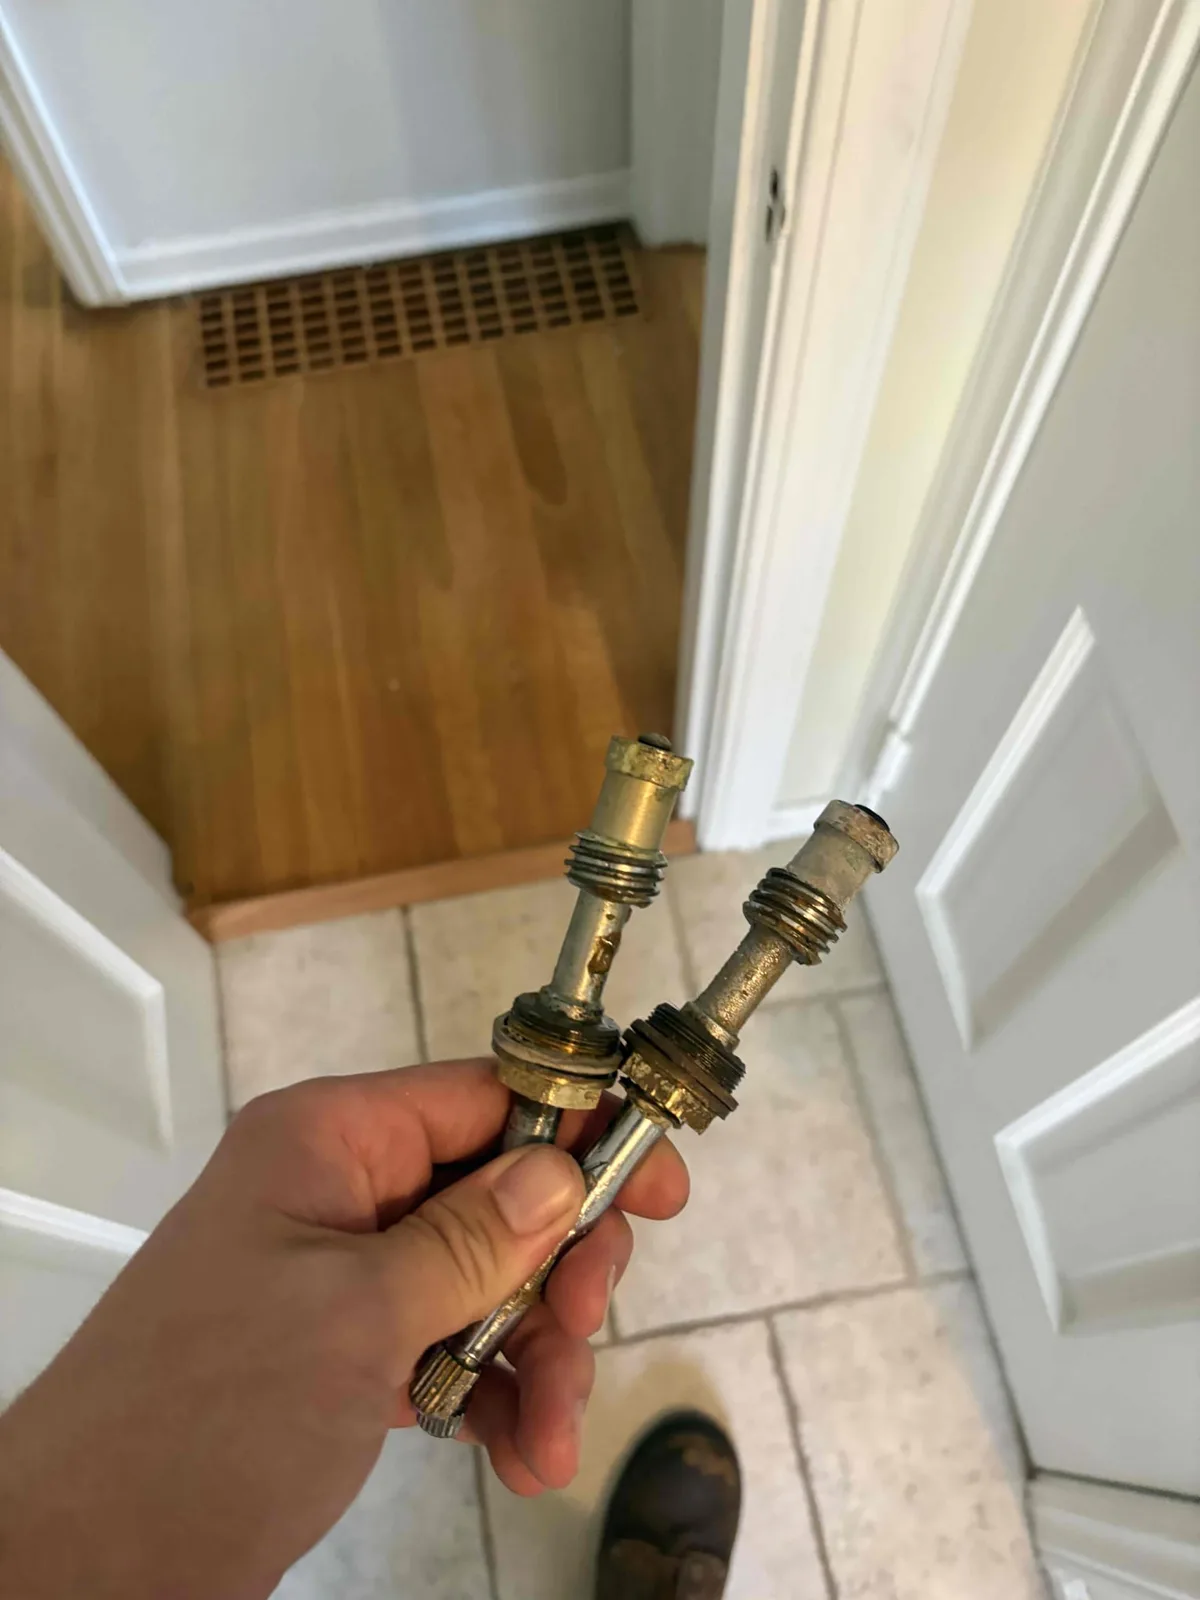
Older two and three handle showers use stems instead of one cartridge. Same idea, one per handle. These came out of a three handle shower.
Is it the cartridge or the whole valve?
This is the question that decides your weekend. Get it right and you spend an hour and the cost of one part. Get it wrong and you have a new cartridge in a valve body that still leaks.
Signs the cartridge is the problem:
- The shower drips from the head or the tub spout after you turn it off.
- The handle is stiff, grinds, or turns farther than it used to.
- Temperature swings, or you cannot get it as hot as before.
- Weak flow at the shower only, while the sink next to it runs fine.
Signs the valve body is the problem:
- Water shows up inside the wall, on the ceiling below, or in the basement under the bathroom.
- A new cartridge did not stop the drip.
- The brass around the cartridge is cracked, pitted or green with corrosion.
- It is an old two handle or three handle valve and parts are no longer sold.
Here is what scale looks like once a handle comes off. This one came off a Plainfield Township shower in November 2025 that could not be shut off at all.
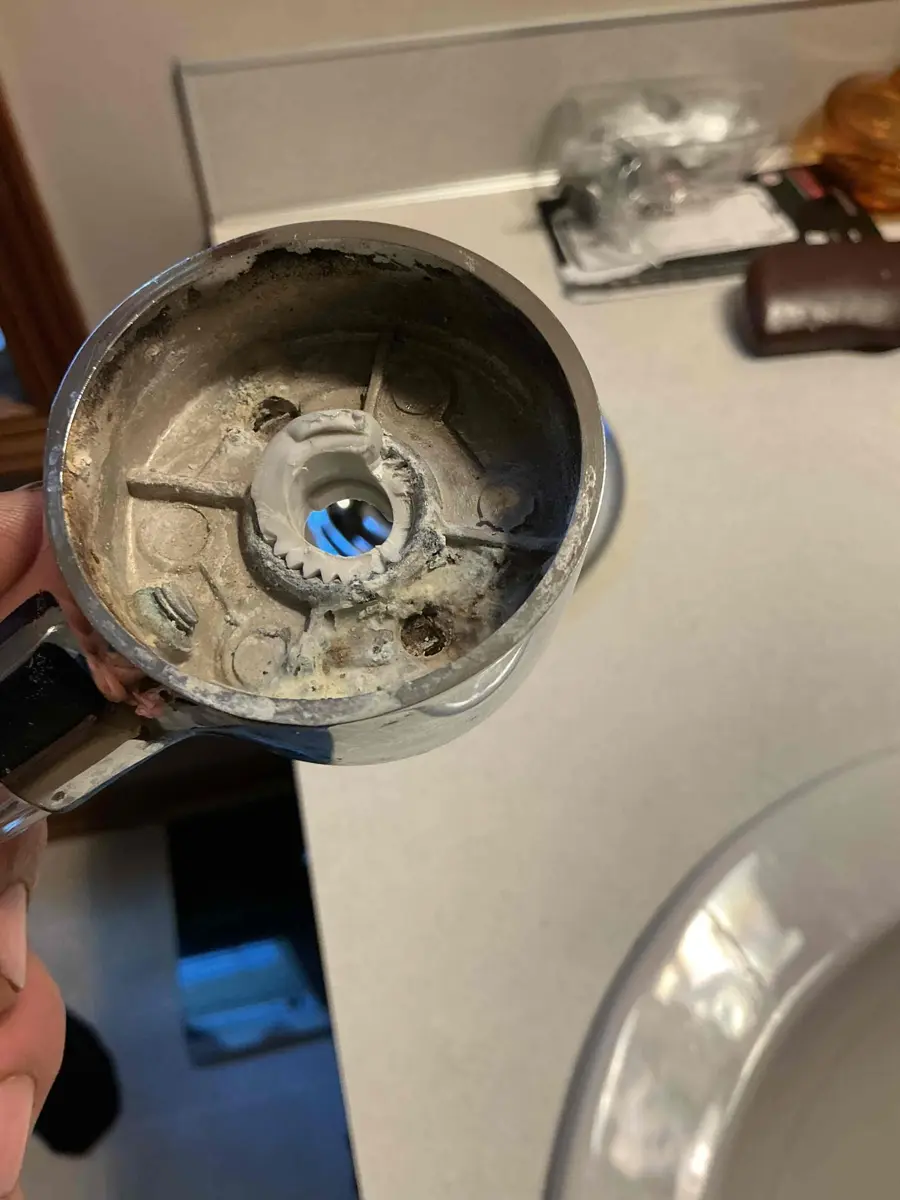
White crust like this inside the handle means the cartridge behind it is almost certainly scaled up too: this is a cartridge job first. Hard water in West Michigan leaves minerals on every moving part in the valve, and the cartridge is the part that suffers most.
If weak flow is your only symptom, our guide on how to increase water pressure in your shower walks through the showerhead and diverter checks that should come before any valve work.
How do I find out what brand my shower valve is?
You cannot buy the right cartridge until you know who made the valve. Cartridges are not universal. A Moen part will not fit a Delta valve, and even within one brand there are several generations that look alike on the outside.
Check these places, in order:
- The trim plate and handle. Many have a logo stamped on the face or the edge. Delta, Moen, Pfister, Kohler and American Standard are the most common in Grand Rapids homes.
- The back of the trim plate. Take it off and look for a stamp or a part number.
- The cartridge itself. Once it is out, the brand and number are often molded into the plastic or stamped in the brass.
- The shape of the handle. Moen single handle valves usually pull out to turn on. Delta single handle valves usually rotate from off through warm to hot.
The best move is to take the old cartridge to the store with you. Match it side by side. If the counter staff cannot match it, that is your first sign the valve may be too old to repair.
On our own jobs, Delta is the valve we install most often. The single handle Delta rough in valve (the brass body that goes in the wall) accepts several Delta trim styles, which makes future cartridge swaps simple. Whatever brand you have, write down the model once you find it. The next person who works on that shower will thank you.
Two handle and three handle valves are a different animal. They use separate stems for hot and cold (a stem is the threaded shaft each handle turns), plus a third for the diverter that sends water up to the head. Those stems wear out the same way a cartridge does, and for many older models replacement stems are hard to find.
How do you replace a shower cartridge step by step?
If the valve body is sound, the cartridge swap is the job most handy homeowners can take on. Plan on one to two hours the first time, mostly spent on stuck parts.
Step 1: Shut off the water at the main and open the tub spout to drain pressure.
Step 2: Cover the drain with a rag so small screws and clips do not disappear.
Step 3: Remove the handle. Look for a set screw under a cap on the front or underneath.
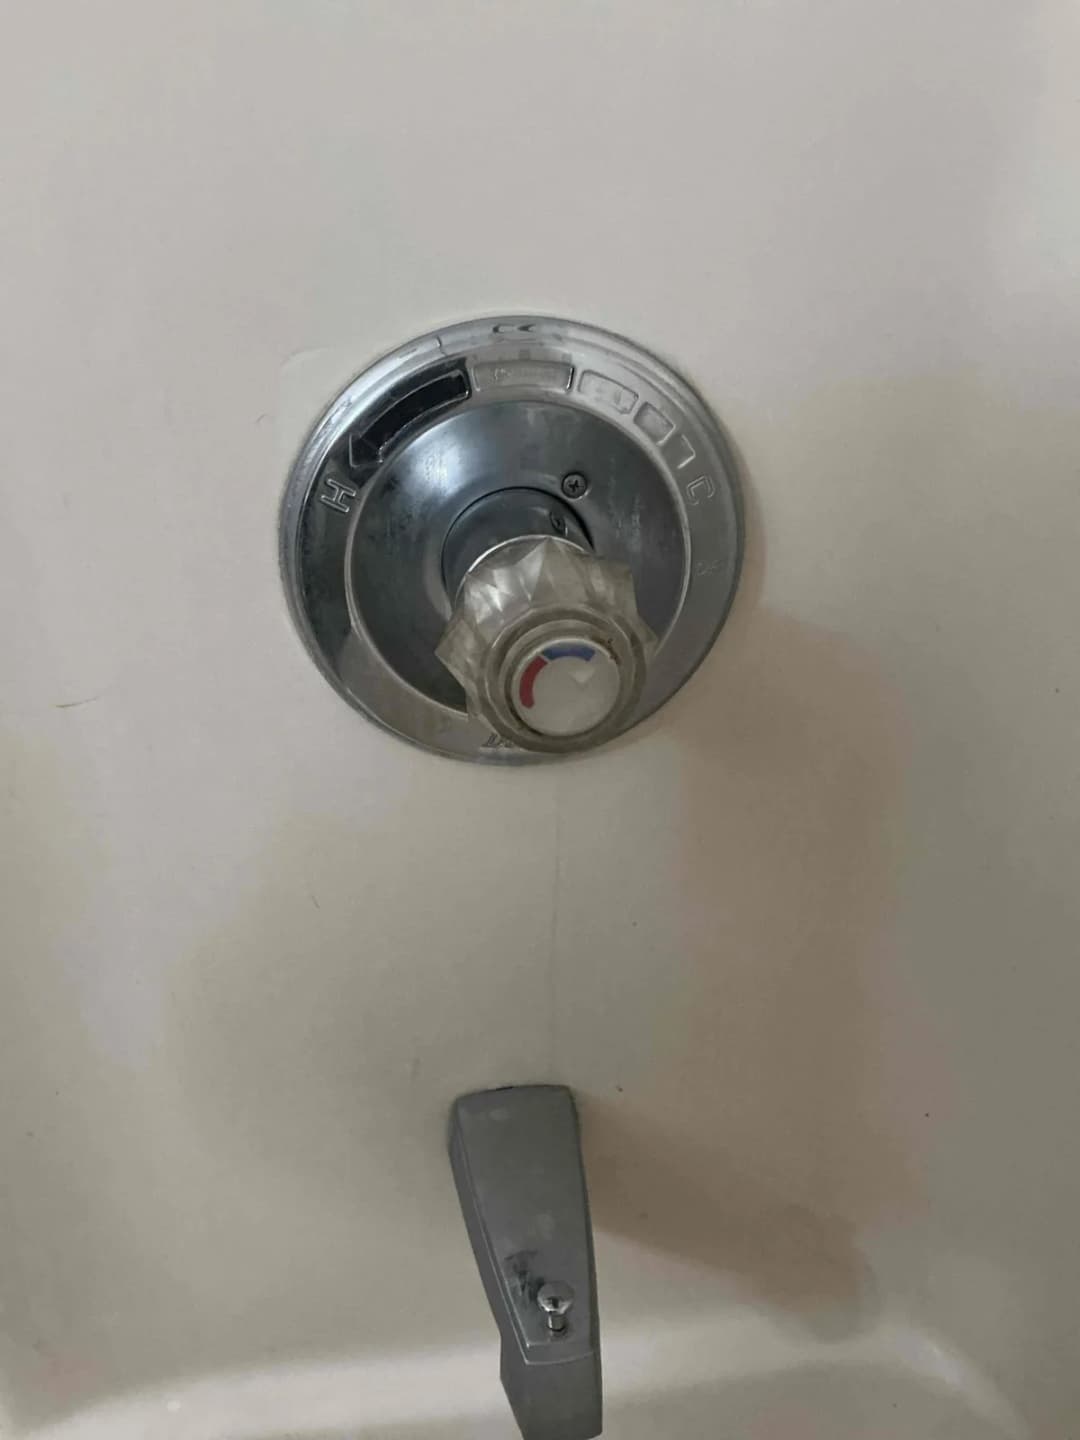
With the handle off you see the stem of the cartridge poking through the trim plate.
Step 4: Remove the trim plate. Usually two screws. Set every screw and clip somewhere it cannot roll into the drain.
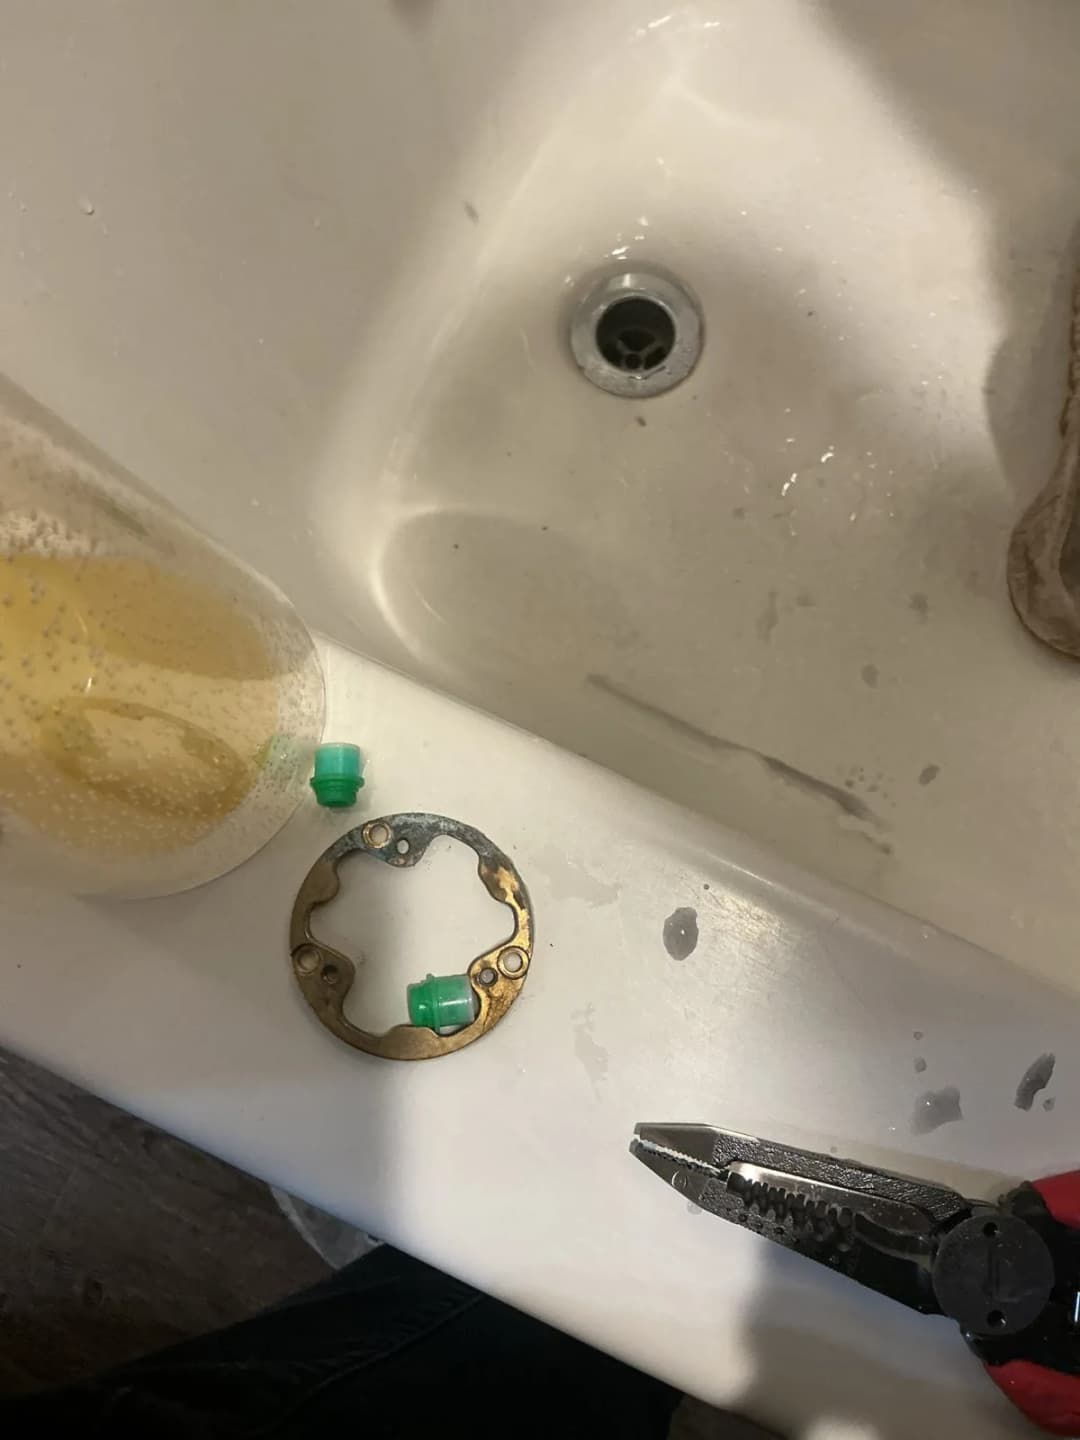
Parts laid out on the tub edge so nothing goes down the drain.
Step 5: Take out the retaining clip or nut. Moen valves use a U shaped clip on top; many Delta valves use a bonnet nut threaded over the cartridge.
The clip or nut holds the cartridge in. Once it is out, nothing else is holding it.
Step 6: Pull the cartridge. Grip the stem and pull straight out. If it will not move, stop and read the next section.
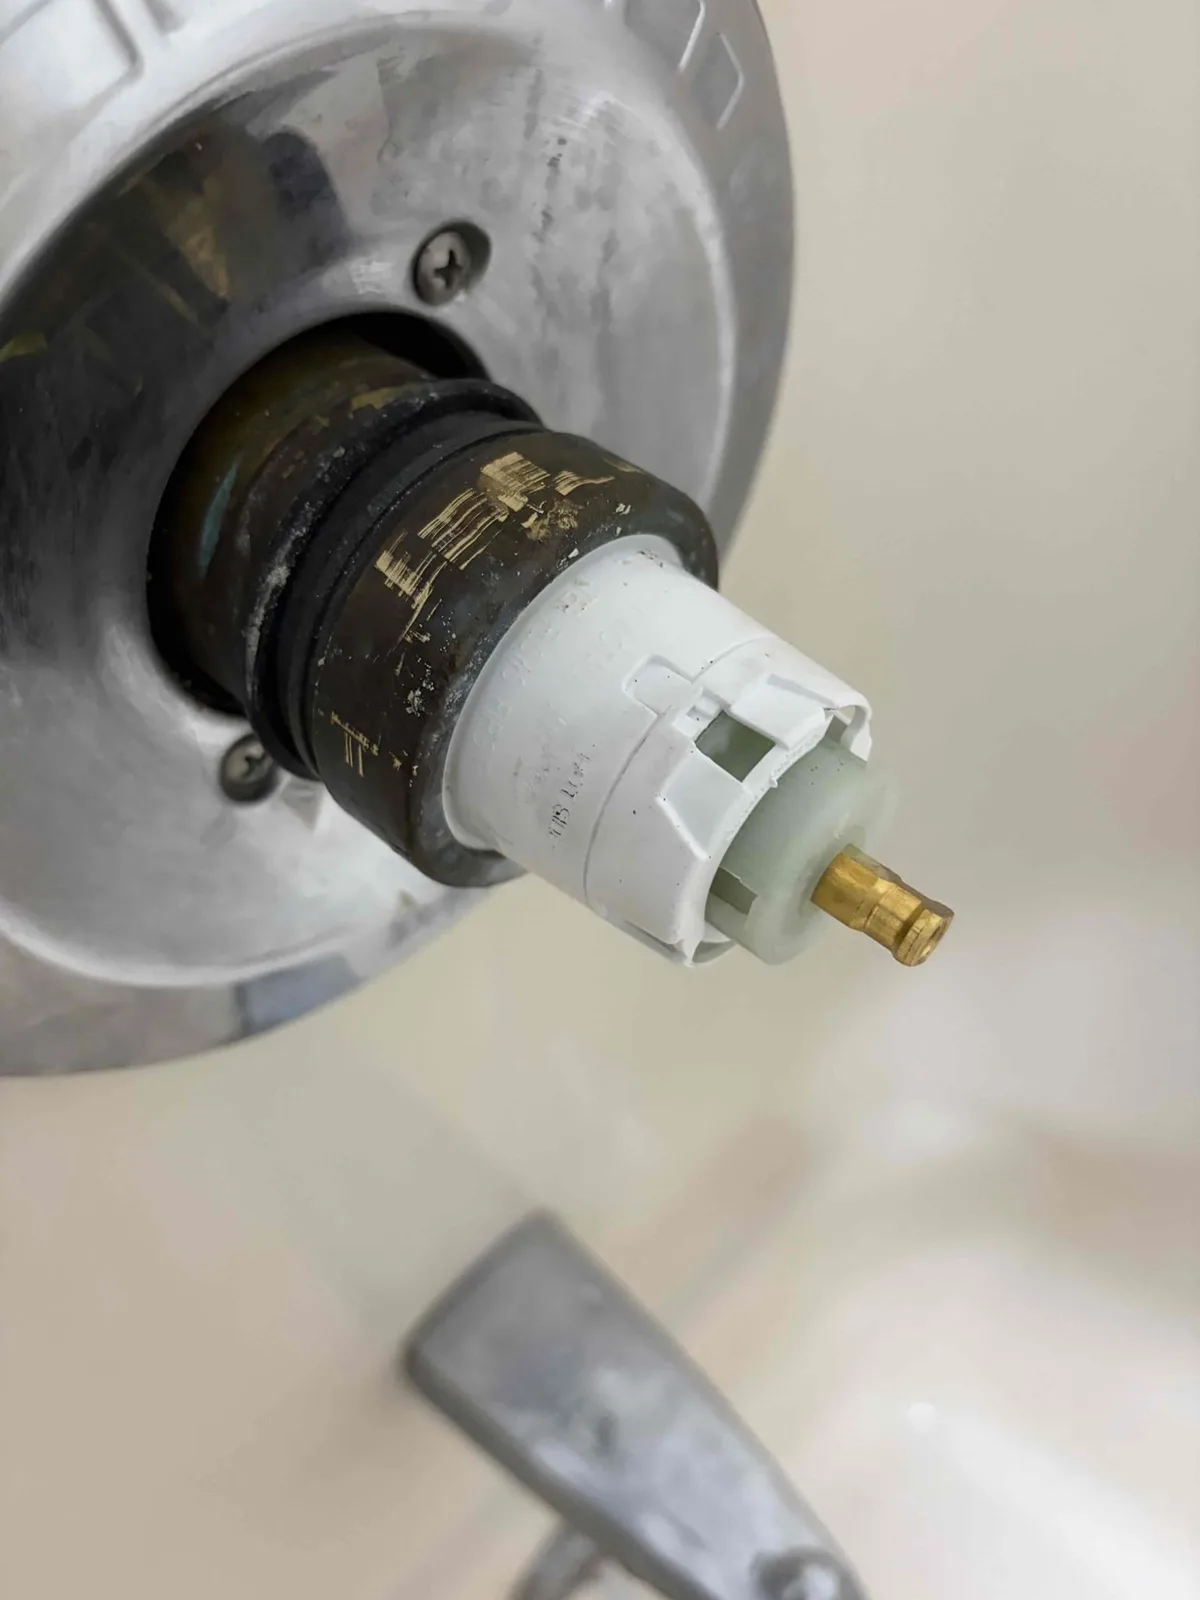
A healthy pull looks like this: the cartridge slides straight out.
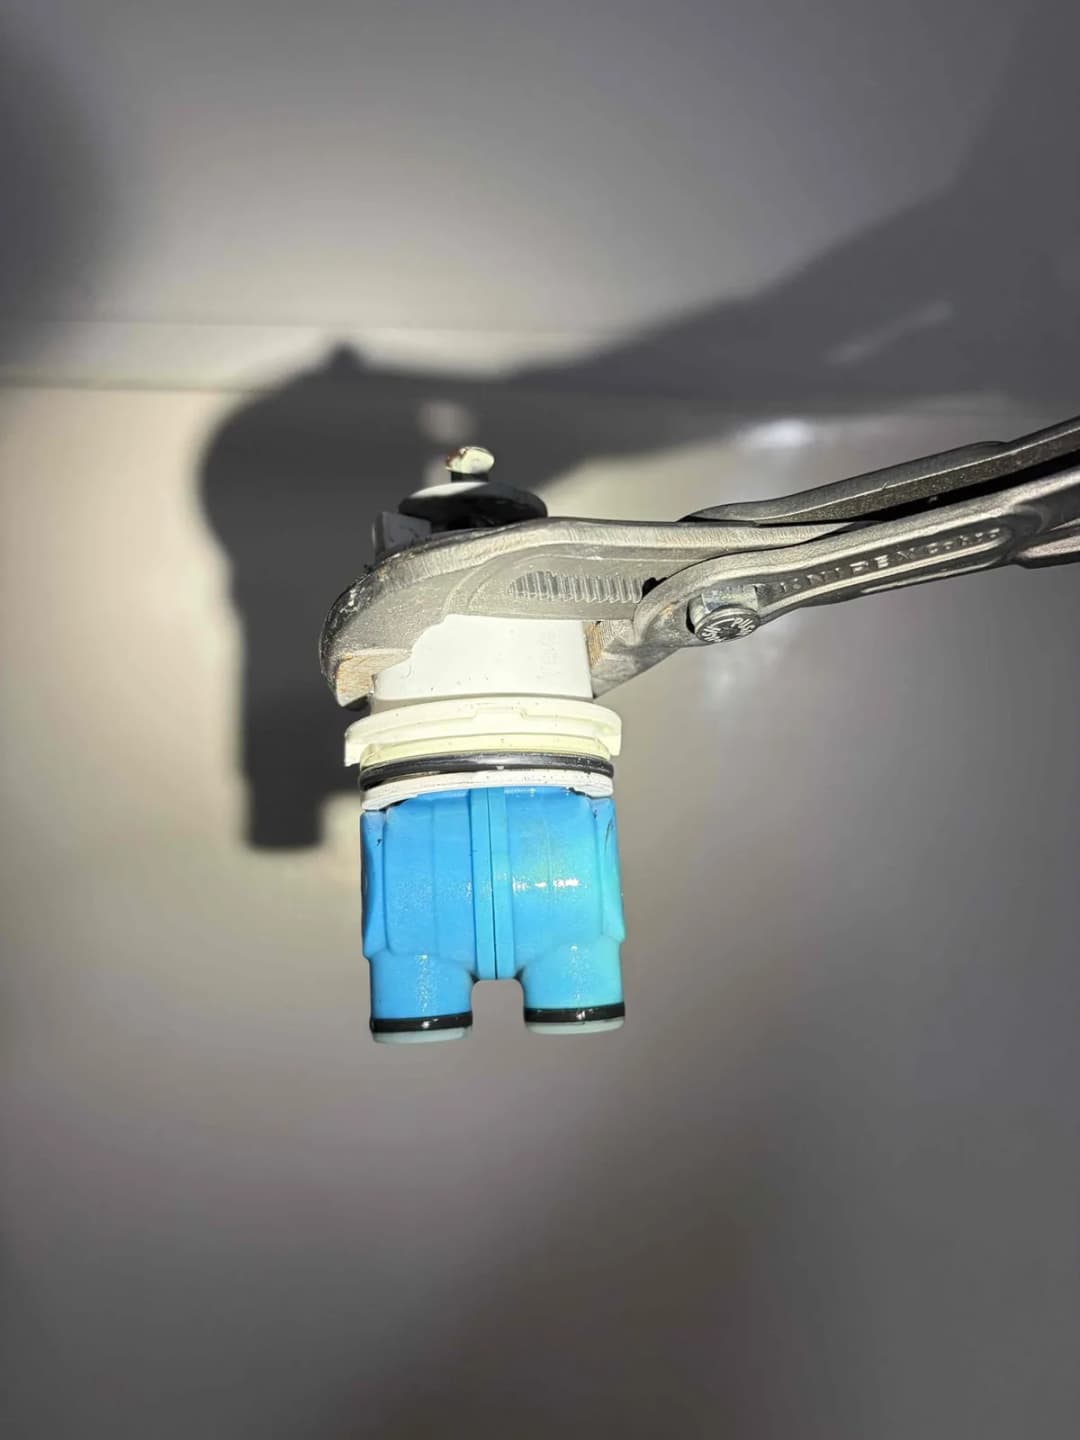
If you need pliers like this, go slow. Twisting hard on a scaled cartridge is how the brass body gets damaged.
Step 7: Clean the valve body inside with a soft cloth. Do not scrape the brass.
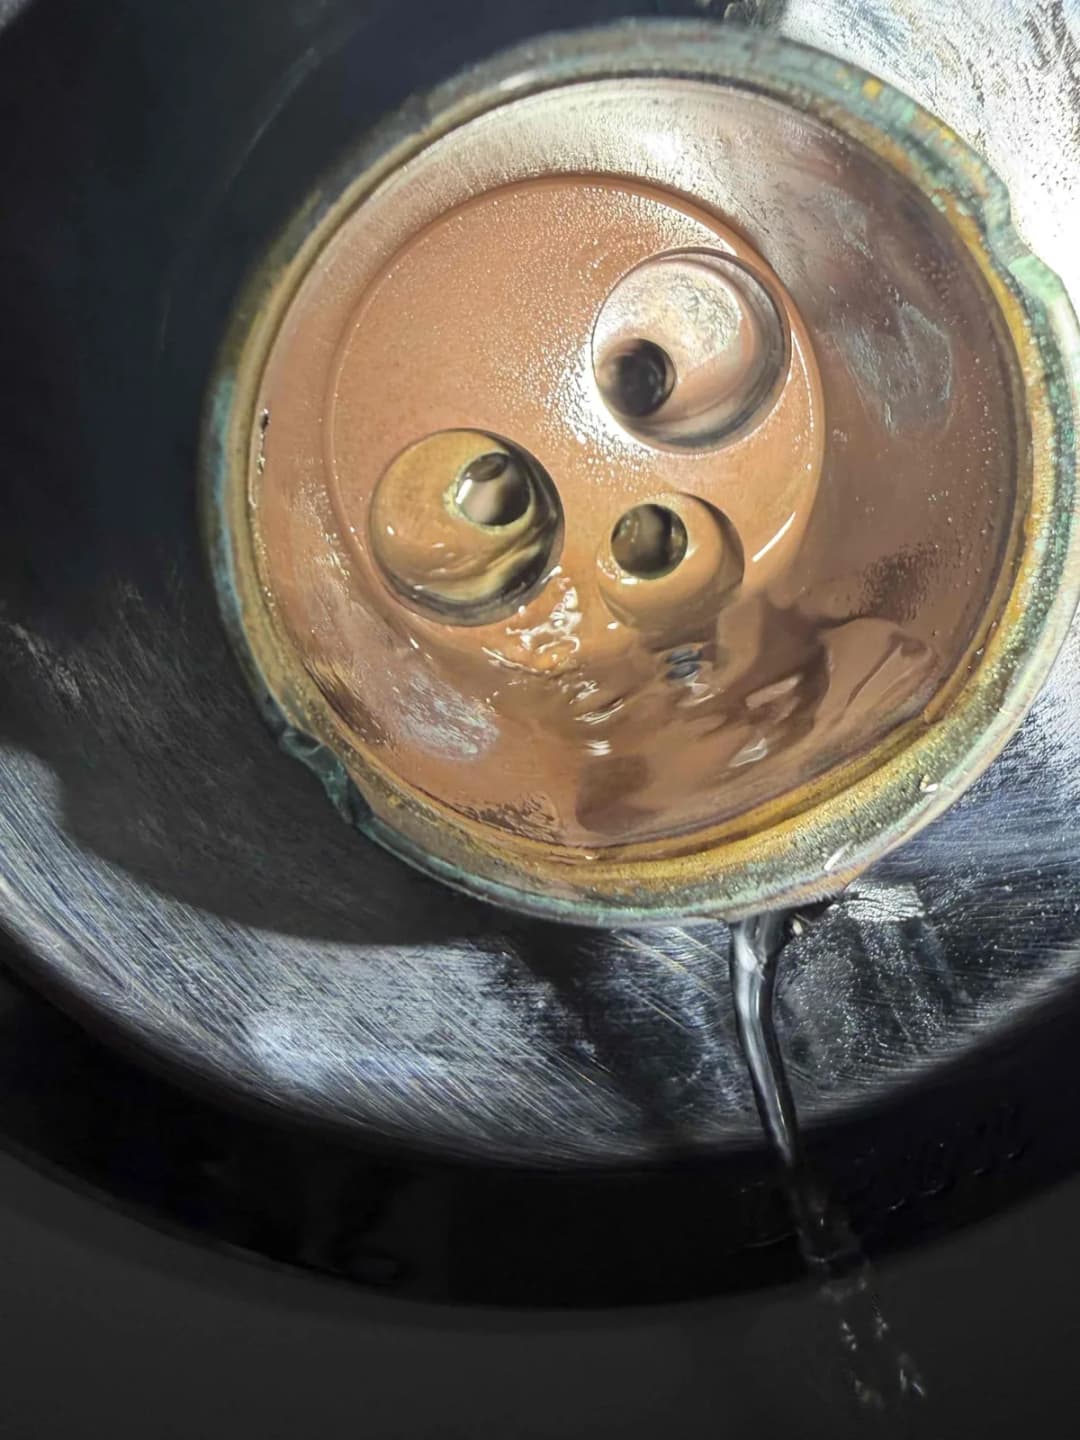
This is inside the valve body. The holes are where hot and cold water come in. Light scale wipes off; cracks or deep pitting here mean a new cartridge will not seal.
Step 8: Install the new cartridge in the same orientation as the old one. Many have a mark that faces up or a notch that keys into the body.
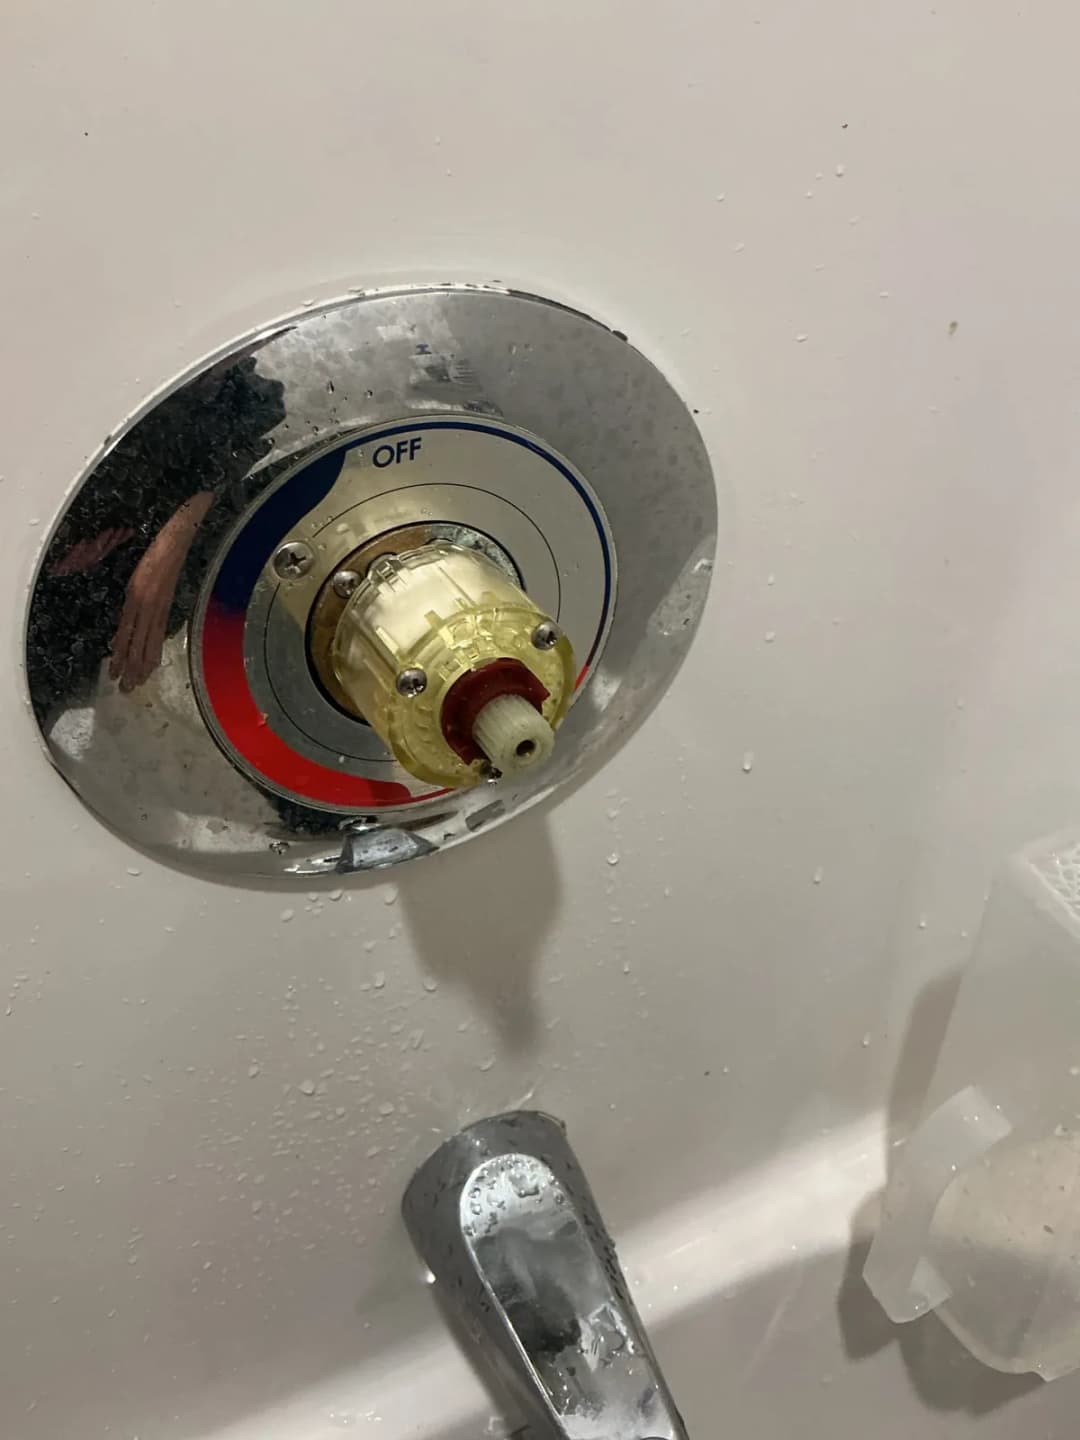
A new cartridge seated and ready for the clip.
Step 9: Reinstall the clip or nut, turn the water on slowly, and check for drips before you put the trim back.
Step 10: Set the temperature limit stop (see below) and reinstall the trim and handle.
The step most people skip is the last one. Every modern single handle valve has a limit stop, a small adjustable piece that caps how far the handle can turn toward hot. It protects against scalding. A new cartridge often comes with it set differently than the old one, so check the hottest setting with a thermometer and adjust it per the instructions in the box.
If the cartridge was the problem, the drip stops immediately and the handle feels smooth. If it still drips, turn the water back off. Something else is going on inside the body.
What do you do when the cartridge is stuck?
This is where a simple job turns into an emergency call. Scale from hard water cements the cartridge to the brass around it. Pull too hard or twist the wrong way and you can break the cartridge off inside the valve, crack the body, or loosen a pipe joint behind the wall.
This is one of the most common shower calls we get. In December 2025 we finished a cartridge swap in a Wyoming condo where someone had started pulling the cartridge and stopped partway. In August 2026 a Jenison homeowner booked us after their own attempt left a cartridge stuck halfway out. Neither was a disaster because both stopped in time.
The one that went further was a Kentwood shower in July 2026. The homeowner tried a cartridge swap, and afterward the copper piping behind the wall started leaking. That turned a cartridge job into a full valve replacement with the wall opened up.
What to try before you force anything:
- Use a cartridge puller made for your brand. It threads onto the stem and pulls straight out without twisting the body.
- Spray a little white vinegar around the cartridge and wait 20 minutes to loosen scale.
- Pull straight, never pry sideways against the brass.
When to stop: if the cartridge has not budged after a puller and some patience, or you hear a crack, turn the water off and call. A stuck cartridge with the water off is a calm repair. A broken valve with the water on is a flooded bathroom.
How do you replace the shower valve body?
When the body itself has failed, the valve has to come out of the pipes. Here is an example of the kind of valve that usually ends up there.
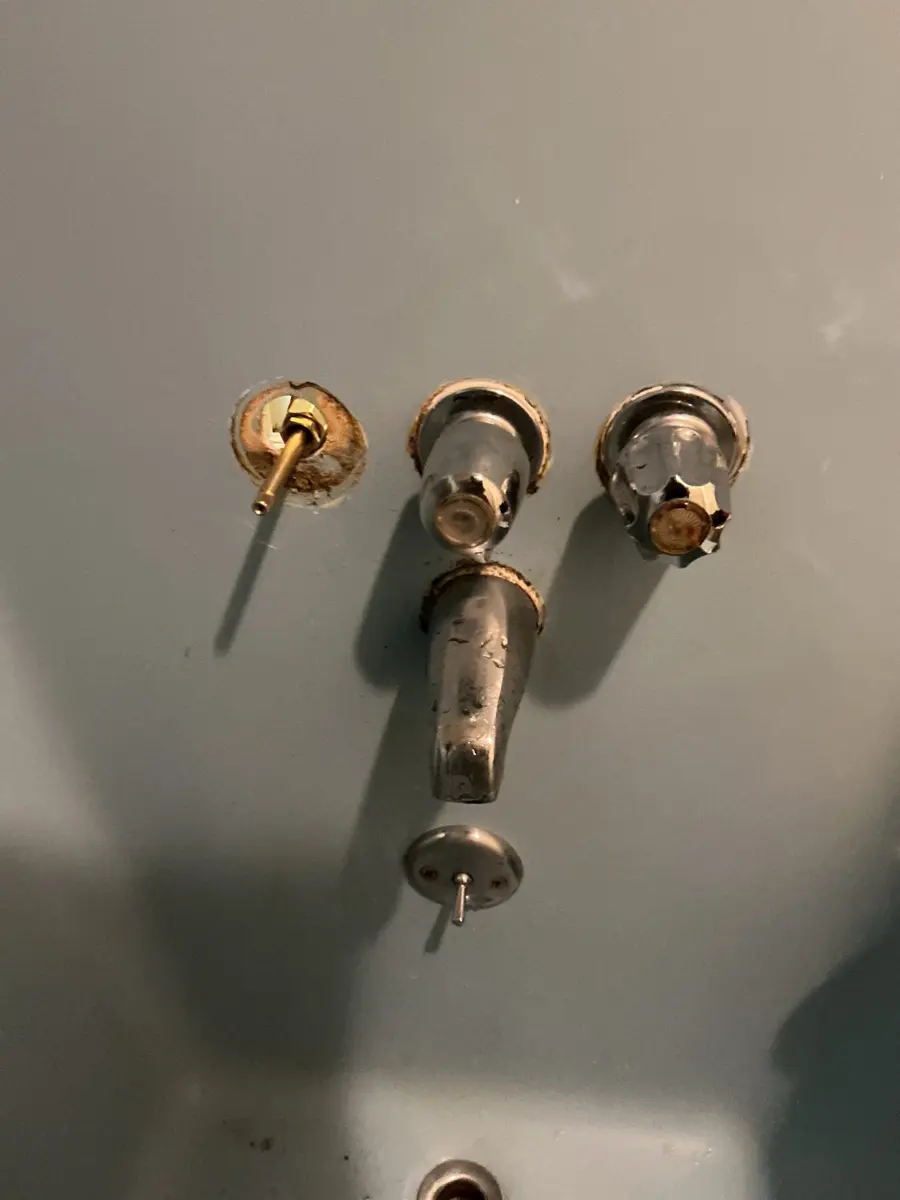
Three bare stems like these on a leaking three handle valve usually mean a full valve replacement, not a repair. This Grand Rapids shower was leaking badly in September 2025. Old three handle valves like this often have no parts left to buy.
Getting to the valve. There are three ways in, from best to worst:
- An access panel on the other side of the wall, in a closet or bedroom. If you have one, this is an easy day.
- The opening behind the trim plate. On some valves there is enough room to work through the hole in the tile or surround, then cover it with a larger plate.
- Cutting the wall. Either from the back side (drywall, easy to patch) or through the tile (hard to match).
Connecting the new valve. Older homes in our area mostly have copper supply lines. NSP connects new valves to copper with press fittings, a clamp on fitting crimped with a powered tool, so there is no open flame inside the wall. PEX (flexible plastic water line) uses crimp rings or expansion fittings. Soldering still works but brings a torch into a wood framed wall, which is why we avoid it there.
Here is a valve that came out through the tile opening, a Wyoming shower in January 2026 where another plumber had already replaced the cartridge and the leak continued.
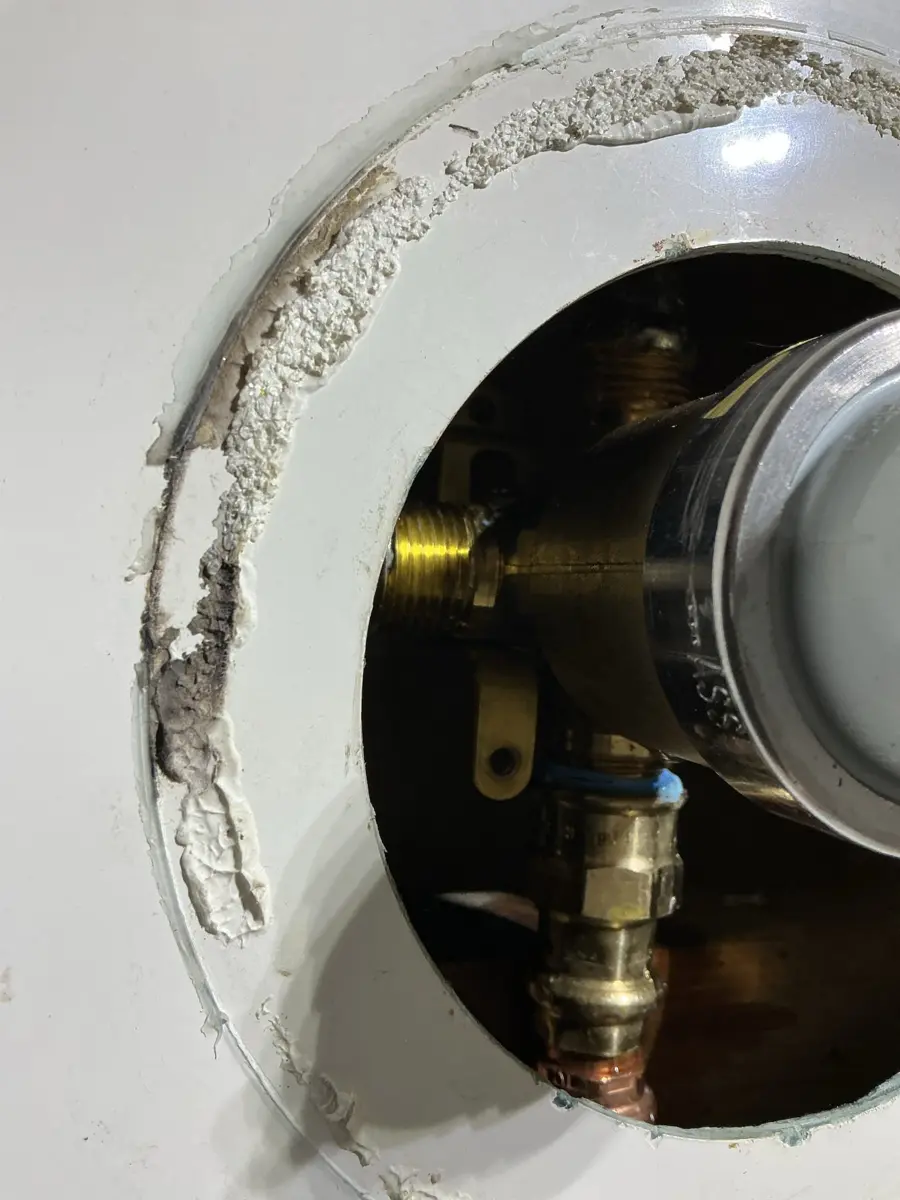
When a new cartridge does not stop the leak, the brass body behind it is the problem, and that is what you see here. We replaced the whole valve with a new Delta single handle body.
Testing. With the new body in, turn the water on with the plaster guard (the plastic cap that protects the valve before trim goes on) still installed. Check every connection for drips before closing the wall. A slow drip inside a closed wall can go months without showing.
When should you call a plumber to replace a shower valve?
Plenty of homeowners handle cartridge swaps. Valve body replacement is a different call. These are the situations where we would steer you to a licensed plumber:
- There is no access panel and the valve sits behind tile you want to keep. Opening tile cleanly takes experience.
- The stops will not turn. Some valves have small shutoffs built in (called stops). If they are seized, you are working with the main off.
- You have old galvanized pipe (gray threaded steel). Disturbing it often starts new leaks down the line.
- You are converting from two or three handles to one. The new valve sits in a different spot, which means new pipe runs inside the wall.
- Water is already in the wall or ceiling.
- The job needs a permit. In Michigan, a plumbing permit has to be pulled by a licensed plumbing contractor or the homeowner, according to LARA's plumbing permit guidance. We pull it and meet the inspector when one is required, and it is part of the quote.
The tell that a job has grown past DIY is usually the second attempt. If one fix did not work, the next step is a diagnosis, not another part.
This is the exact setup that makes valve work clean. In a Grand Rapids area rental in February 2026 we replaced a leaking three handle valve with a single handle Delta.
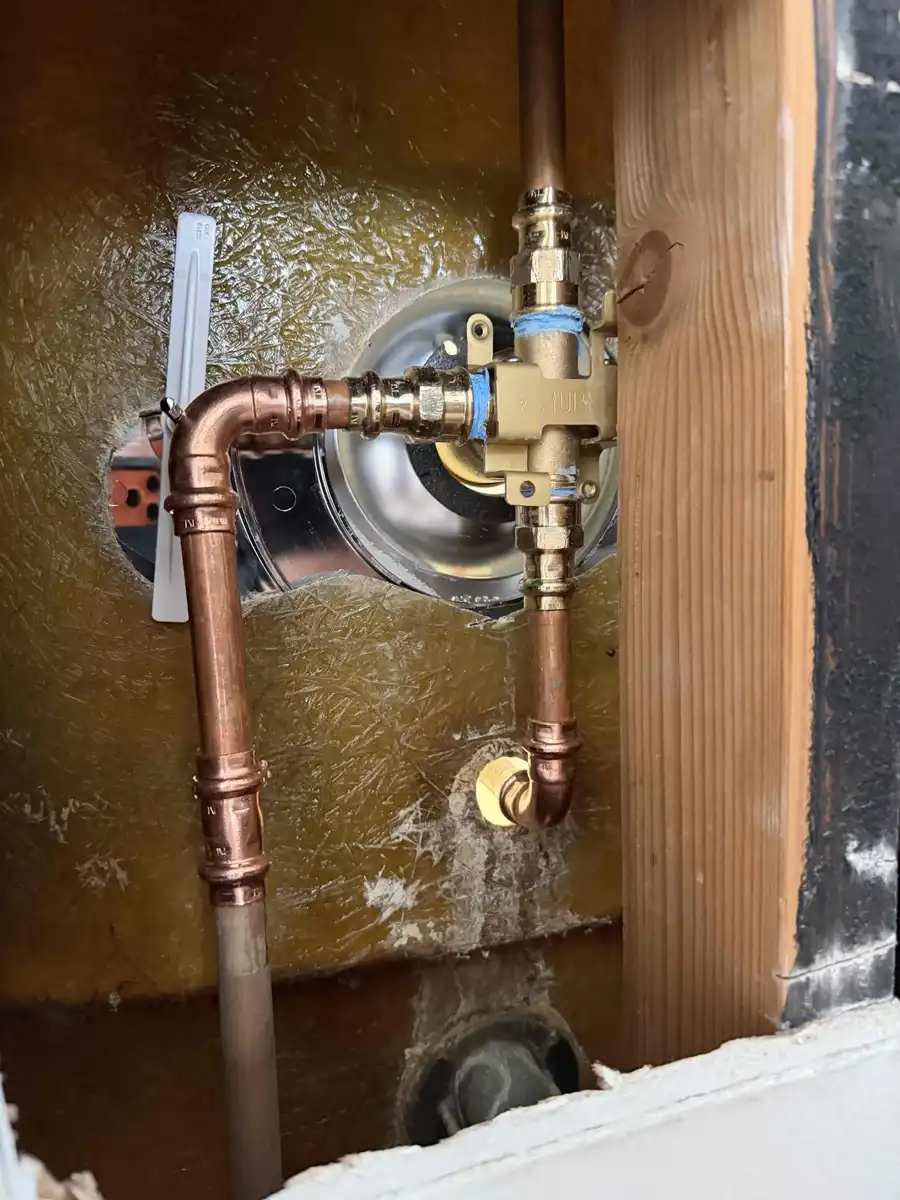
The new single handle valve sits on fresh copper with press fittings: no torch in the wall, and it is ready to test. The opening was made from the back side of the wall so the tub surround was never touched.
What does Michigan code require for a new shower valve?
You do not need to memorize the code, but you should know one rule, because it decides which valve you buy.
The Michigan Residential Code, section P2708.4, requires shower and tub shower valves to be pressure balancing, thermostatic or a combination of the two. A pressure balancing valve senses a sudden drop on the cold side (like when someone flushes a toilet) and cuts back the hot side so you do not get scalded. A thermostatic valve holds a set temperature directly. Both must meet the ASSE 1016 standard, the safety test these valves have to pass.
The same section requires a way to limit the maximum setting to 120°F, adjusted at installation. That is the limit stop from the cartridge steps above.
What this means for you:
- Any new single handle valve from a major brand at a supply house already meets this. Check the box for ASSE 1016.
- Old two and three handle valves usually do not. When we replace one, it gets a compliant single handle valve.
- After any cartridge or valve work, set the limit stop. It is the one step that protects kids and older adults in the house from a burn.
For background on water use, the EPA WaterSense showerhead page explains why many modern heads flow at lower rates. Your valve has to be rated for the flow of the head you install, which is another reason to buy the valve and trim as a matched set.
How do you hide the holes from an old shower valve?
Converting from three handles to one leaves holes in the tile where the old handles were. Retiling a whole shower for that is overkill. Most of the time a cover plate solves it.
Your options:
- An oval or rectangular cover plate (often sold as a renovation plate) that is larger than standard trim. It covers the old handle holes and the area where the wall was opened.
- A tile patch with leftover tile, if you have it. Matching old tile is rarely perfect.
- A new surround or wall panels if the shower needs updating anyway.
Here is the finished result from that same February 2026 rental, seen from the shower side.
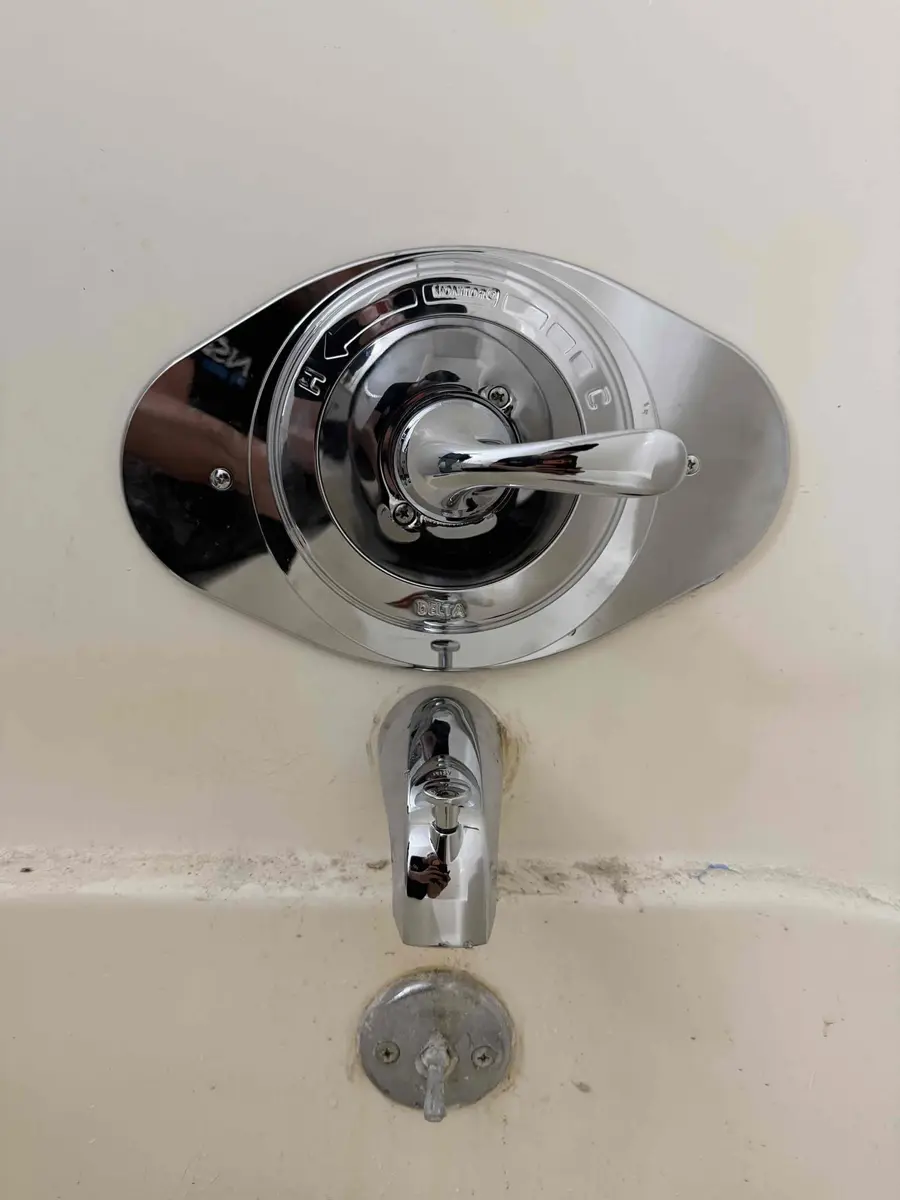
The oval plate covers every old hole, so the tile stays: one handle, no retiling. The customer asked for exactly this, and it is the cheapest way to modernize an old three handle shower.
And on the other side of that wall, we left a removable panel.
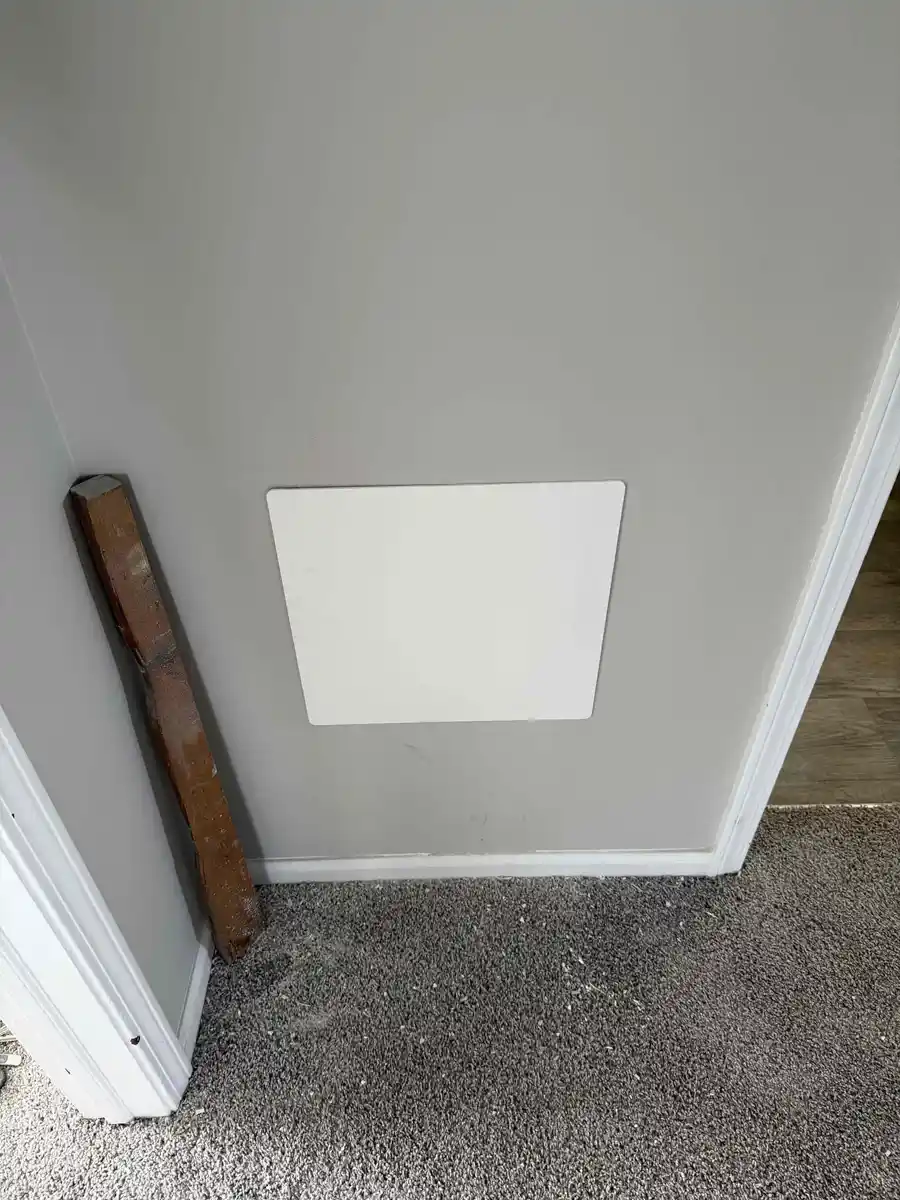
This small panel means the next valve repair is a quick visit instead of a wall cut. If we open drywall behind a shower, we recommend closing it with a panel like this rather than patching it shut.
What does a new valve look like once it is in?
When a shower valve is installed right, a few things are true. It is level, it is set at the correct depth so the trim sits flush against the finished wall, and the supply lines are strapped so the valve does not move when you turn the handle.
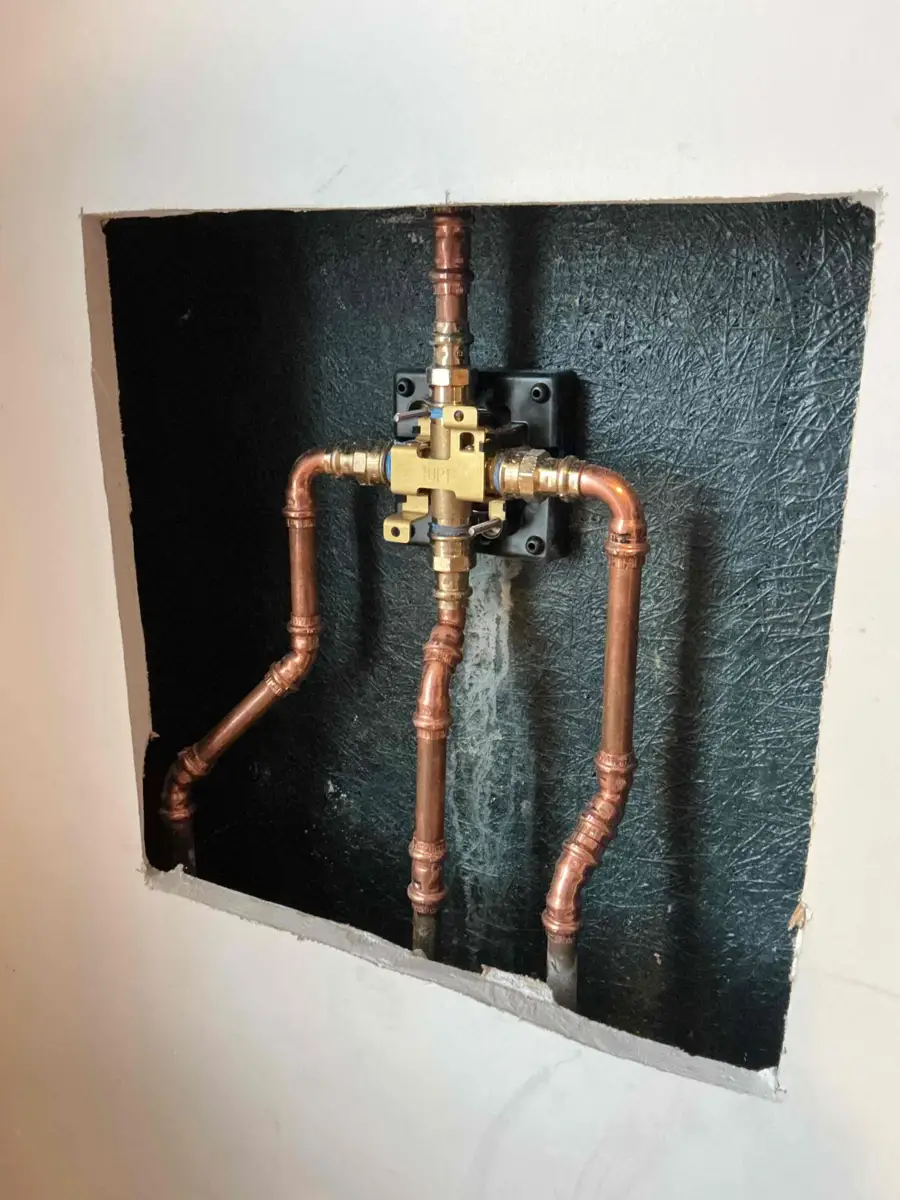
Straight copper lines and a firmly mounted valve mean this shower will not shift or leak when the handle turns. This was a Delta valve we installed in November 2025, replacing an existing valve, with the riser to the showerhead going straight up from the top port.
Depth matters more than people think. If the valve sits too deep, the handle will not reach the cartridge. Too shallow, and the trim will not sit tight to the wall, which lets water behind it. Most valves include a plastic guard marked with the acceptable range for the finished wall surface.
Ask for the model number when the work is done. Whoever installs your valve should tell you the brand and model, so you can buy the right cartridge in ten years without guessing.
Can I replace a shower valve without removing tile?
Often, yes. If there is an access panel or a closet behind the shower, the valve can be replaced from the back side. Some valves can also be worked on through the trim opening and covered with a larger plate. Tile only has to come out when the valve sits behind tile on both sides with no other way in.
How do I know if my shower cartridge is bad?
A bad cartridge usually shows up as a drip from the head or tub spout after the shower is off, a stiff or grinding handle, temperature swings, or weak flow at only that shower. If a new cartridge does not fix those symptoms, the valve body behind it is the likely problem.
Is a shower cartridge universal?
No. Cartridges are made for a specific brand and model of valve. A Moen cartridge will not fit a Delta valve, and even one brand has several versions. Remove the old cartridge and bring it to the store to match it, or find the model number on the trim or the cartridge itself.
Do I need to shut off the water to the whole house to replace a shower valve?
Usually, yes. Most homes have no separate shutoff for the shower. Some valves have small built in stops that let you isolate just that valve, but in older homes those are often seized. Shut off the main and drain the lines by opening a faucet on a lower floor.
Can I change a three handle shower valve to a single handle?
Yes. It means opening the wall, removing the old valve and installing a new single handle valve with new pipe runs to it. A large oval cover plate can hide the old handle holes so the tile stays. In Michigan the new valve must be a pressure balancing or thermostatic type.
Why does my shower still drip after replacing the cartridge?
Either the new cartridge is not the correct match, it was installed out of alignment, or the brass seat inside the valve body is worn or corroded and the cartridge cannot seal against it. If the part and orientation are right, the valve body needs to be replaced.
Does a new shower valve need a permit in Michigan?
It depends on the scope and your city. A straight cartridge swap generally does not. Replacing the valve body or changing piping can. In Michigan the permit is pulled by a licensed plumbing contractor or the homeowner, and NSP handles it as part of the job when one is needed.
Get your shower valve fixed by a licensed Grand Rapids plumber
NSP Plumbing is a licensed Michigan plumbing contractor, license #8004990, based in Wyoming, Michigan. We repair and replace shower valves and cartridges across Grand Rapids, Wyoming, Kentwood, Grandville, Jenison, Caledonia, Byron Center and the rest of the area.
We start with the cheapest fix that will actually work. If a cartridge will do it, that is what we quote. If the valve body has failed, we show you why before any wall is opened, then do the work through an access panel whenever we can.
For full shower and tub work, see our shower and tub installation service. For other faucets and fixtures, see fixture installation or general plumbing repair. If water is already coming through a ceiling, our emergency plumbing team answers around the clock. You can also read what customers say in our reviews.
Shower dripping or leaking behind the wall?
A licensed NSP plumber pulls the handle, tells you whether it is the cartridge or the valve, and gives you a written price before any work starts. Book online and pick a time that works for you.