

Water is pooling around your ankles, or you want a new drain cover. Most guides assume every shower drain comes apart the same way, and they do not. How you pull out a shower drain depends on which of four drain types you have, and identifying it first is what saves the drain.
What kind of shower drain do I have?
Before you grab a screwdriver, take a close look at the cover over the drain hole. Plumbers call that cover the strainer or grate. What holds it in place tells you how the rest of the drain comes apart.
Here are the four types we see in Grand Rapids homes:
- Snap in strainer. A round metal grate with no screws on top. It is pressed into a plastic drain body underneath and held by friction or small tabs. This is the most common drain on fiberglass and acrylic shower bases.
- Screw in strainer. A grate with one or two small screws through the face, or a grate that threads into the drain body and turns like a jar lid.
- Tub drain with crossbars. If your shower is also a bathtub, the drain is a metal ring with a cross shape inside it. That ring, called the drain flange, threads into a fitting under the tub.
- Tile shower drain. A square or round grate set into a tiled floor, or a long narrow grate along one wall. These are built into the floor itself, and only the grate is meant to come out.
The Michigan Plumbing Code sets a few rules every shower drain has to meet, which is why they all look a bit alike. The strainer must be removable, at least 3 inches across, with openings at least 1/4 inch wide, and the drain pipe under it must be at least 1 1/2 inches (Section 421.3). "Removable" is the important word: every shower strainer is designed to come out, even when it looks permanent.
Here is the most common type on a fiberglass shower base.
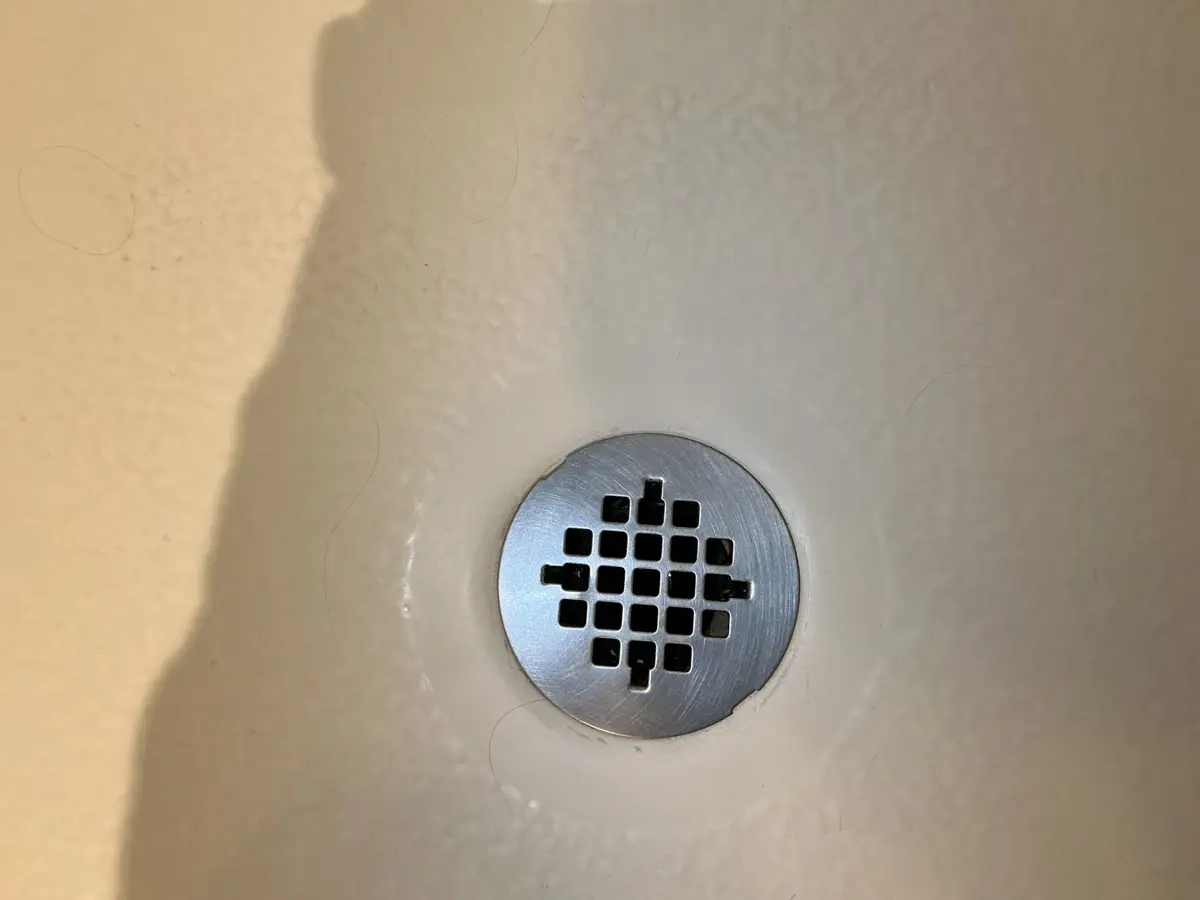
A grate with no screws on top is almost always a snap in strainer. It comes out with a thin flat tool slid under the edge. If you see this style, you do not need any special drain tools to get to the clog.
One more check before you start. Look at what is under the shower if you can. In a lot of homes around Grand Rapids, a first floor shower sits over an unfinished basement, and you can see the drain pipe from below. That view tells you whether the drain is glued, threaded or held with a rubber seal, and it matters later if anything goes wrong.
What tools do I need to remove a shower drain?
For most shower drains, you need less than you think. Gather these before you start so you are not leaving a half open drain while you run to the store:
- A flat screwdriver or a putty knife for prying up a snap in strainer.
- A Phillips screwdriver for strainers held with screws.
- Needle nose pliers for reaching into the drain and grabbing the crossbars on a tub drain.
- A drain removal tool, sometimes sold as a drain key or tub drain wrench. It is a short metal bar with notched ends that lock into the crossbars so you can turn the drain without bending it.
- A hair dryer to soften old sealant before you turn anything.
- A rag or a drain plug to stuff in the opening so screws and hair do not fall down the pipe.
- A flashlight, because you will be looking straight down a dark pipe.
Here is the tool that causes the most damage. People reach for a pair of large pliers, put the handles in the crossbars, and crank. Pliers grip unevenly, so they twist one crossbar and leave the other in place. Once a crossbar bends or snaps, a tool can no longer grip the drain, and a simple removal turns into a much harder job.
The rule we give homeowners: if the drain does not move with a proper drain removal tool and steady pressure, stop. Forcing it with pliers or a hammer and screwdriver is how drain bodies crack and how fiberglass shower bases get chipped.
A cleaning tool helps too. A plastic hair snake, the thin barbed strip sold in every hardware store, clears most shower clogs once the strainer is out. You may find you do not need to remove anything more than the grate.
When we pulled the cover on this tub and shower combo, the problem was sitting right under it.
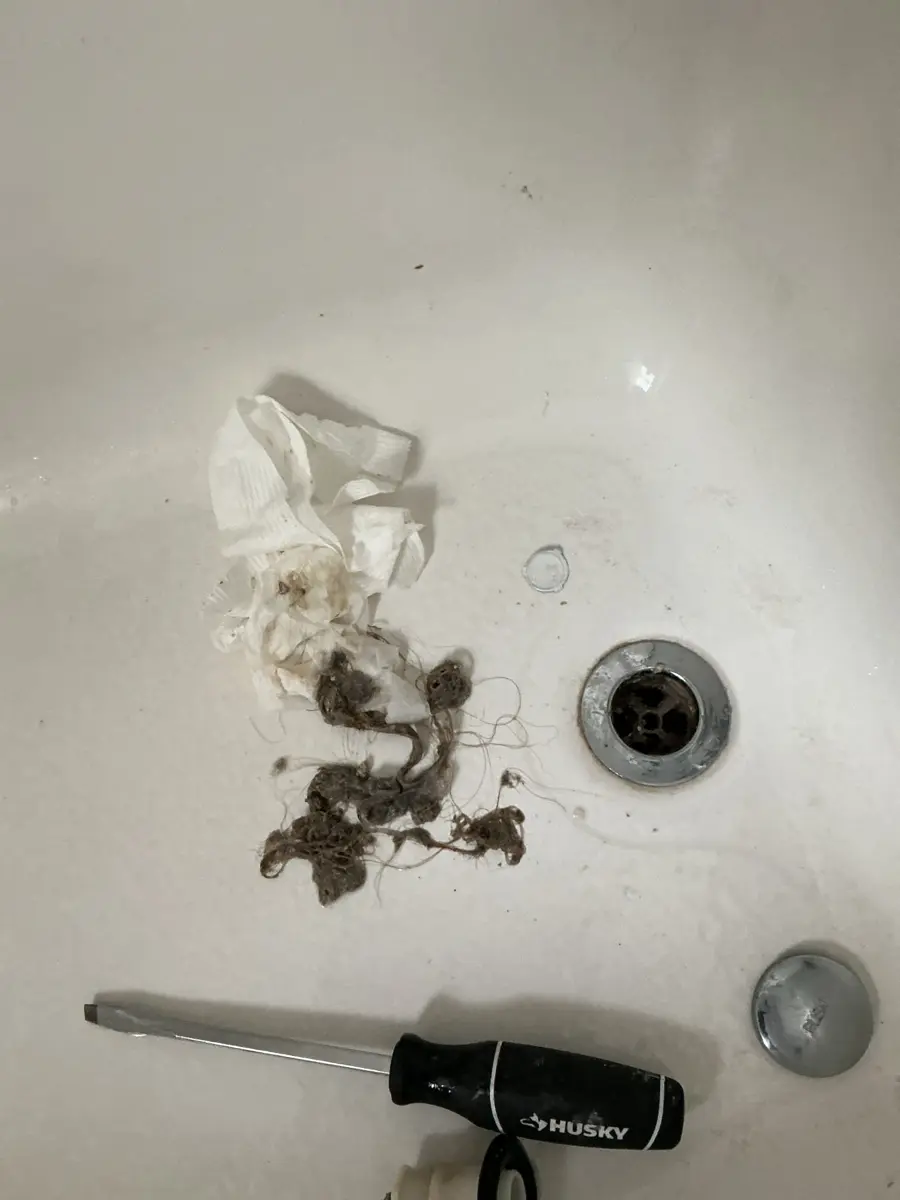
This clog was sitting right under the cover, not deep in the pipe. Hair wraps around the crossbars and the stopper parts just below the cover. Pulling the cover and cleaning this area fixes a large share of slow shower drains with no pipe work at all.
How do I remove a snap in or screw in shower drain cover?
Start with the strainer. Even if your end goal is replacing the whole drain, the strainer has to come out first.
For a snap in strainer:
- Run the shower for a few seconds so the area is wet, then dry the edge of the grate with a towel so you can see it clearly.
- Slide the tip of a flat screwdriver or putty knife under the edge of the grate.
- Gently lift. Work your way around the circle in small steps rather than prying hard in one spot.
- The grate should pop free. If it feels stuck, check again for small screws hiding under soap scum.
For a screw in strainer with screws on top:
- Stuff a rag loosely around the grate edges so a dropped screw cannot fall down the drain.
- Remove the screws with a Phillips screwdriver. Old screws are often corroded, so turn slowly and press down firmly to keep the head from stripping.
- Lift the grate straight up.
For a strainer that threads in like a lid: there are no screws and no gap to pry. Press your palm flat on the grate, push down and turn counterclockwise. A rubber jar opener or a piece of shelf liner gives your hand more grip. If it will not budge, a little penetrating oil around the edge, left for 15 minutes, usually loosens it.
Once the strainer is off, you are looking at the drain body. That is the plastic or metal fitting that the strainer sat in, and it connects your shower floor to the pipe below.
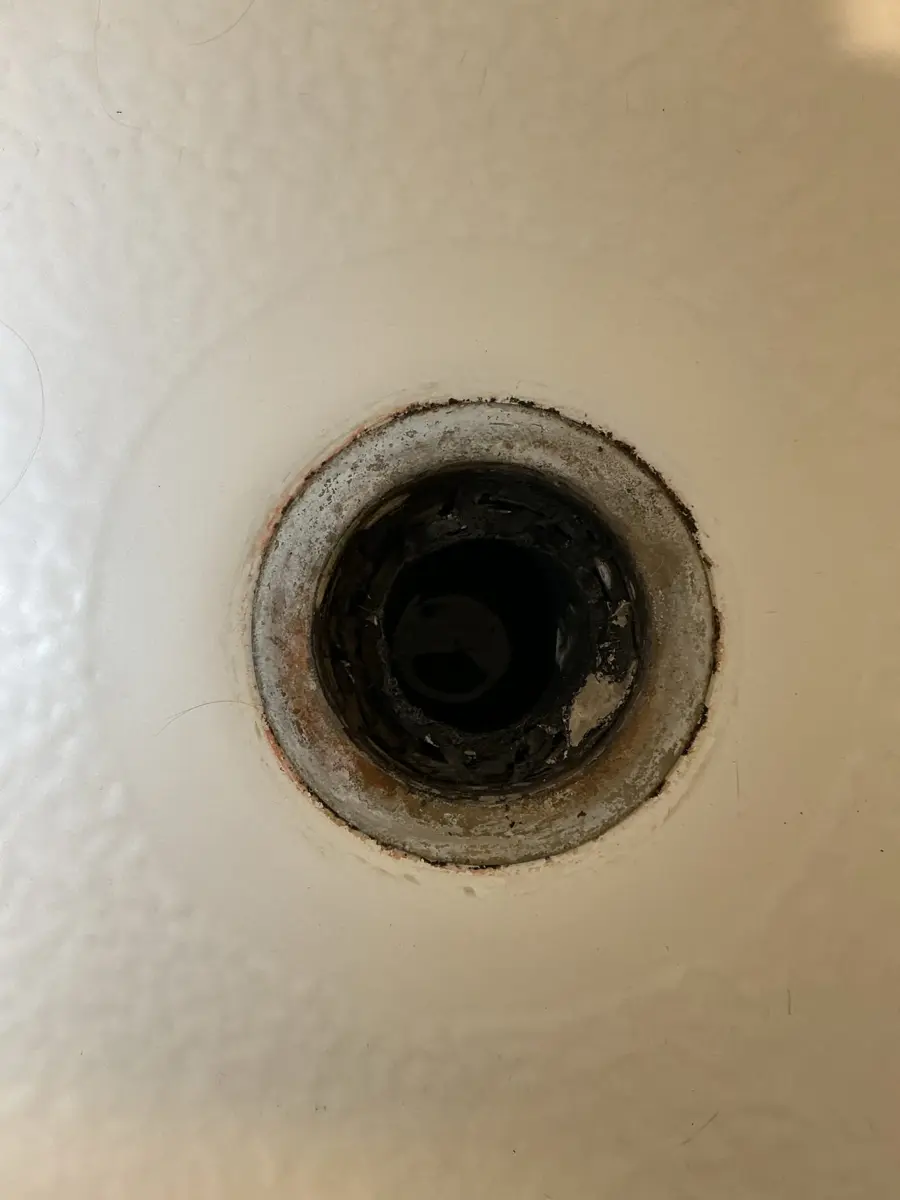
This is what most drains look like with the cover off: buildup, but nothing broken. The rust ring and dark film are soap and hair residue, not damage. A good cleaning and a new strainer are all this drain needs. You do not need to pull the drain body to fix it.
At this point, try to clear the clog. Push a hair snake down, pull it back slowly, and repeat until it comes up clean. Then run hot tap water for a minute. If the water drains quickly, you are done. Snap the strainer back in or replace it with a new one that matches the size.
How do I pull out a tub and shower drain with crossbars?
A tub and shower combination works differently. The metal ring you see in the bottom of the tub is the drain flange, and it screws into a fitting underneath the tub called the drain shoe. To pull the flange out, you unscrew it from above.
- Remove the stopper. Most tub stoppers lift and twist out, or have a small set screw on the knob. Some have a screw under the cap. Look for the one that applies to yours and take it out so you can see the crossbars.
- Warm the flange. Old drains are usually sealed with plumber's putty, a soft clay like sealant that hardens over the years. Run a hair dryer over the flange for a couple of minutes to soften it.
- Seat the drain removal tool. Push the notched end of the tool down into the crossbars until it locks. Make sure both crossbars are engaged, not just one.
- Turn counterclockwise. Use a wrench or a screwdriver through the tool's handle for leverage. Steady, even pressure works better than sudden jerks.
- Lift it out once the threads let go, then scrape the old putty from the tub surface with a plastic putty knife.
Older drains may also have a ring of silicone caulk around the edge. Cut that with a utility knife before you start turning, or the flange will fight you even after the threads break loose.
Here is what it looks like when the flange is out and only the opening is left.
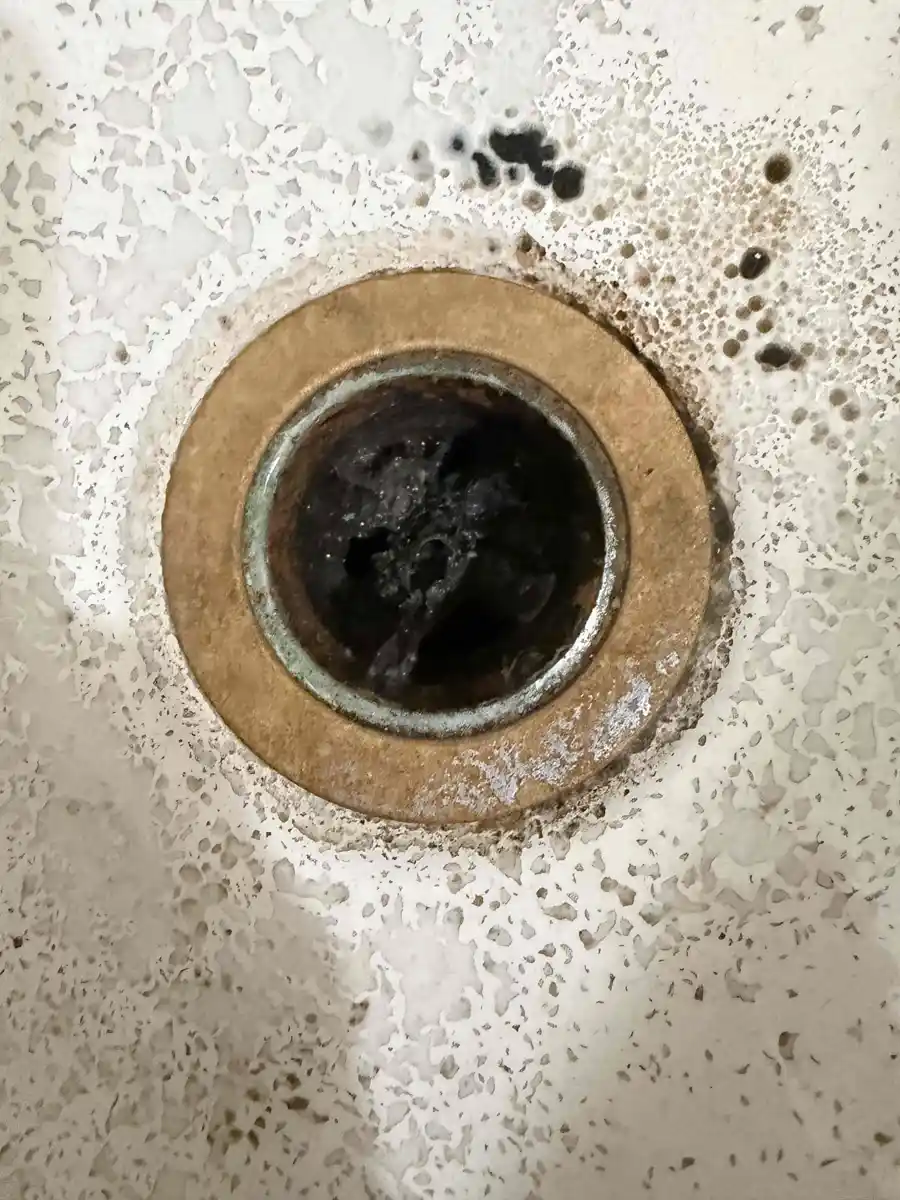
With the flange out, check the threads: if they are not cracked, a new drain can seal here. The tan ring is old sealant, and the dark spots around it are surface stains, not damage. As long as the threads inside are intact, a new drain goes back in with fresh sealant.
When you install a new flange, use the putty or sealant the drain manufacturer calls for. Some newer plastic drains and some stone or composite tubs say not to use plumber's putty because it can stain. Read the label before you buy.
How do I remove the drain body from a shower base?
This is where most of the online instructions stop being accurate. Pulling the strainer is easy. Pulling the drain body from a fiberglass or acrylic shower base depends entirely on how it was connected underneath, and there are two common ways.
Compression drains. Many shower bases use a drain body held by a large threaded nut and a rubber gasket that squeezes around the pipe. You can spot one because, with the strainer out, you see a ring of plastic with notches or lugs in it and a rubber seal around the pipe. These can be unscrewed from above with the right spanner tool and replaced without going under the floor. Manufacturers such as Oatey make compression style shower drains for exactly this reason.
Glued drains. Other drain bodies are glued directly onto the plastic pipe from below. From above, you see a smooth plastic ring with no notches. Unscrewing the top half only loosens the nut against the base. The bottom half stays glued to the pipe, and the only way to replace the drain is from underneath.
Here is the view from below that settles which kind you have.
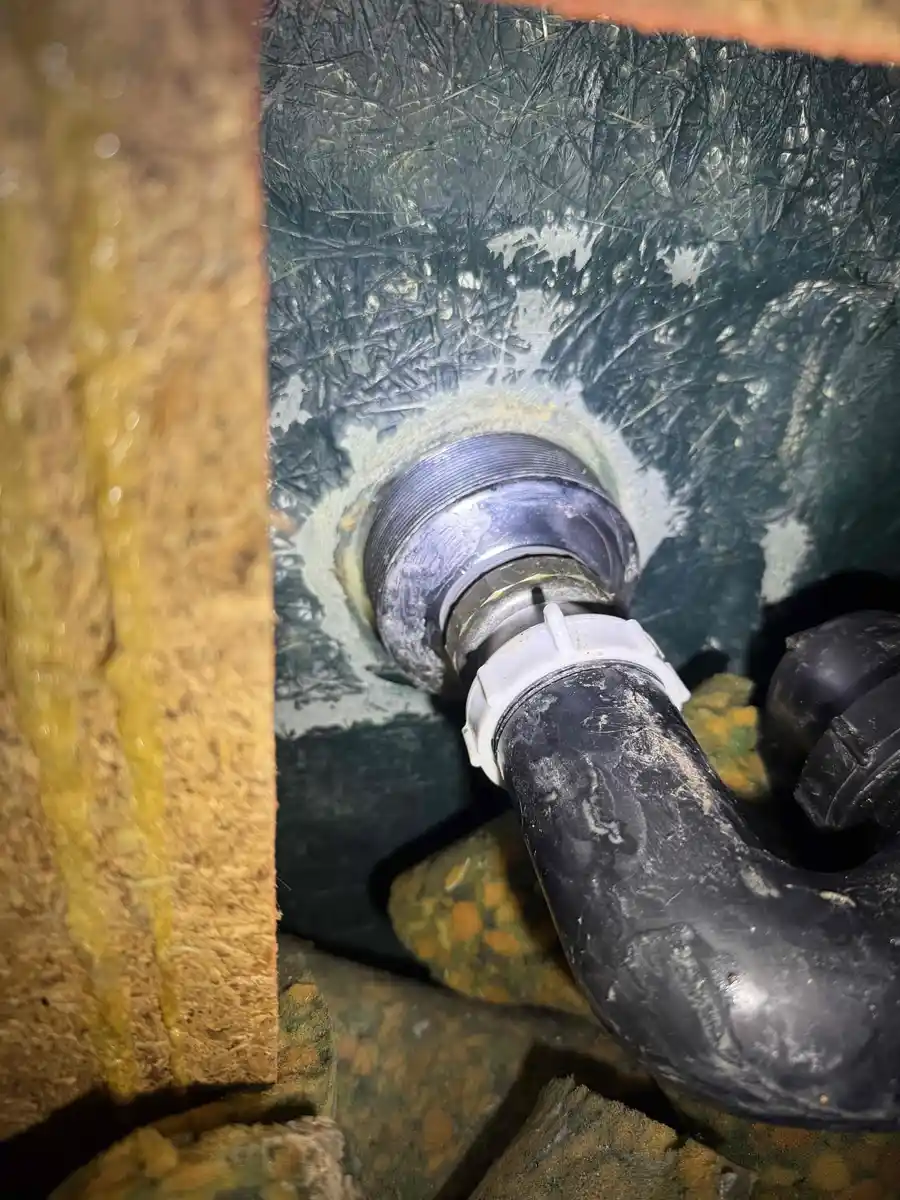
From underneath you can see exactly how this drain is attached, which decides whether it can be fixed from above. This homeowner had water running down the wall below the shower. Getting eyes on the joint from underneath is how the plumber confirmed whether the leak was the drain itself or the pipe below it.
If your drain is glued and the space below is a finished ceiling, you still have options. There are retrofit drains made to fit down inside the existing pipe from above, sealing with a rubber gasket instead of glue. Retrofit drains show up regularly on our own shower drain invoices, because they replace a cracked or leaking drain without cutting into a ceiling.
Do not try to remove a glued drain body by breaking it out from above. Pieces fall down the pipe, the pipe end gets chewed up, and there is nothing left for a new drain to seal against. That is when a quick fix becomes a ceiling repair.
Can I remove a tile shower drain or a linear drain?
Tile showers are built differently. The floor is a layer of mortar over a waterproof liner, and the drain is clamped to that liner. The Michigan Plumbing Code requires the liner to be watertight and to turn up at least 2 inches above the threshold on every side (Section 421.5.2). The drain body is part of that waterproofing.
So for a tile shower:
- The grate comes out. Square and round tile drain grates are usually held by two small screws, or they sit in a frame and lift straight up. Some thread into an adjustable collar and turn counterclockwise.
- The drain body does not. It is clamped to the liner and buried in mortar. Removing it means breaking out the tile floor, and usually rebuilding the shower pan.
Linear drains, the long narrow grates along one wall, work the same way. Lift the grate, and you will find a removable hair catcher or a slot leading to a round opening at one end.
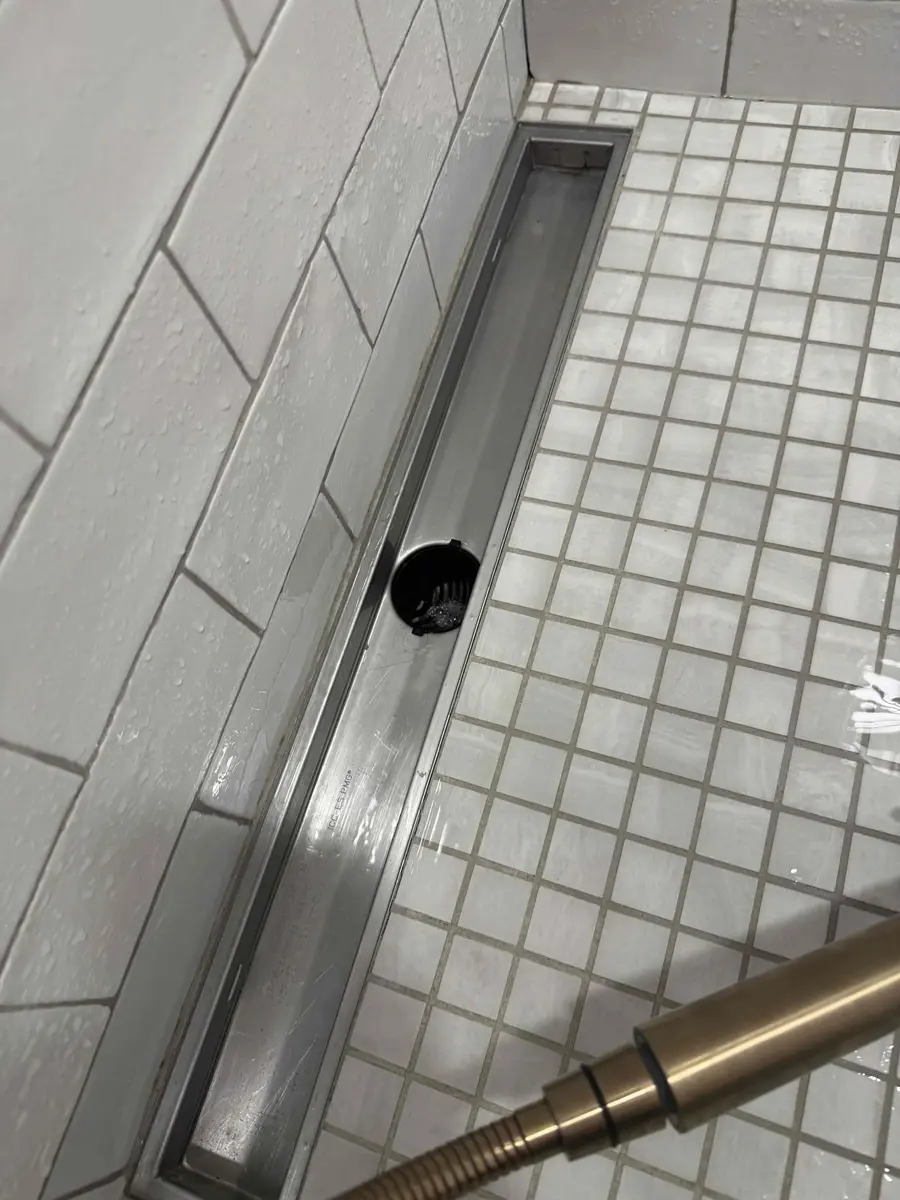
On a linear drain, lifting the grate is all you need to clean it. The channel and the round opening at one end are permanent. Hair collects in the channel and in the opening, and it cleans out with a gloved hand and a hair snake.
If a tile shower drain is leaking, the grate is not the problem and pulling it will not fix anything. The usual cause is the seal between the drain and the liner, or a liner that has failed. Signs include stains or bubbling paint on the ceiling below, grout that stays dark long after a shower, or loose tiles near the drain.
Those leaks need a plumber who can test the pan. That means plugging the drain, filling the floor with an inch or two of water, and watching for a drop over a few hours. It is the same flood test inspectors use on new shower pans.
What if the drain is stuck or the crossbars break?
Drains that have been in place for 20 or 30 years often refuse to move. Corrosion locks the threads together, and old putty sets like glue. Here is the order we try things in before doing anything drastic.
- More heat. Run the hair dryer for five minutes, not one. Plastic tubs and fiberglass bases can soften if you overdo it, so keep it moving and stop if the surface gets too hot to touch.
- Penetrating oil. Spray it around the edge and down into the threads. Wait 20 minutes, then try again.
- A better grip. A drain removal tool with a long handle gives more steady leverage than pliers ever will.
- An internal drain extractor. If the crossbars are broken, this tool expands inside the drain and grips the walls so you can still turn it.
If all of that fails, stop there. Plumbers can carefully cut a seized flange out in sections, but a slip with the blade cuts into the drain shoe or the tub, and the repair moves under the floor.
Snapped crossbars are common, and they do not mean the shower is ruined. It just means a different tool is needed. In most cases the tub and the pipe underneath are fine.
Here is one more reason a drain can seem stuck when it is not. The clog is not in the drain at all.
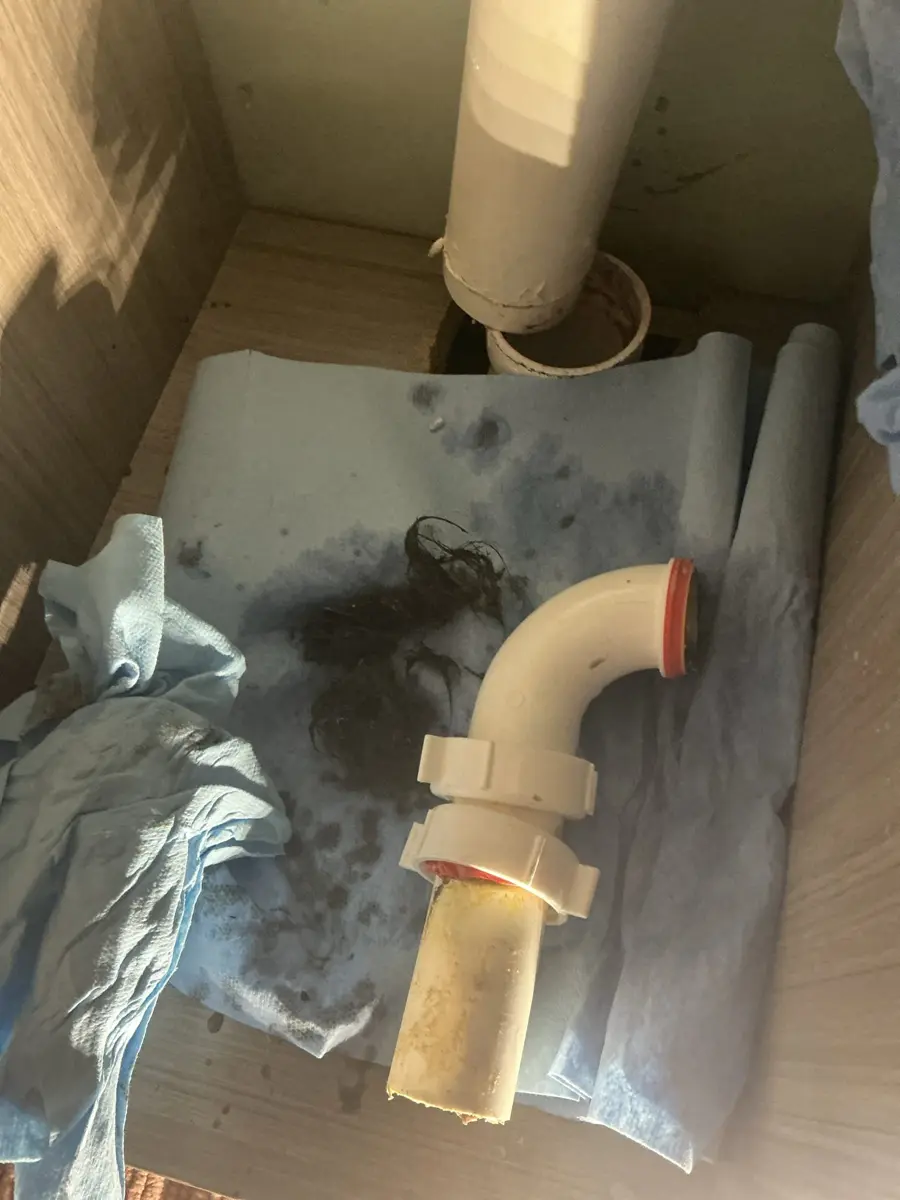
The clog here was not at the drain cover but in the curved pipe below it. This curved section is the trap, which holds a small pool of water to keep sewer gas out of the bathroom. The code requires every fixture to have one (Section 1002.4). Hair and soap settle there, and no amount of work on the drain cover reaches it.
If the drain was removed and the shower is still slow, the clog is lower down. A hand snake can reach a trap, but if water still backs up, the blockage is farther along the pipe. Our drain cleaning service clears that part with a powered machine without opening walls or floors. If a smell came along with the slow drain, the trap or a vent is often involved, and a plumber can check both on the same visit.
When does pulling a shower drain become a bigger job?
Most drain removals stay small. A few signs mean the job is bigger than a new strainer, and it is better to know before you start pulling.
The shower base flexes or cracks near the drain. Fiberglass and acrylic bases need solid support underneath. When they flex with every step, the movement breaks the seal at the drain over time. A new drain will leak again unless the base is supported or replaced.
Water is showing up below the shower. A stain on the ceiling, a drip in the basement, or soft flooring outside the shower door means water is getting past the drain or the base. Replacing a strainer does not fix that.
The drain pipe below is old metal. Many older Grand Rapids homes still have galvanized steel or cast iron drain pipes. Turning a stuck drain can crack the old pipe joint beneath it. If you can see rusty, flaking pipe below the shower, call before you crank.
You are changing the shower layout. Moving a drain to fit a new base or switching from a tub to a walk in shower is new drain piping, and in Michigan it usually requires a plumbing permit (Michigan LARA plumbing permit information). When we do that work, we pull the permit, meet the inspector, and it is part of the written quote.
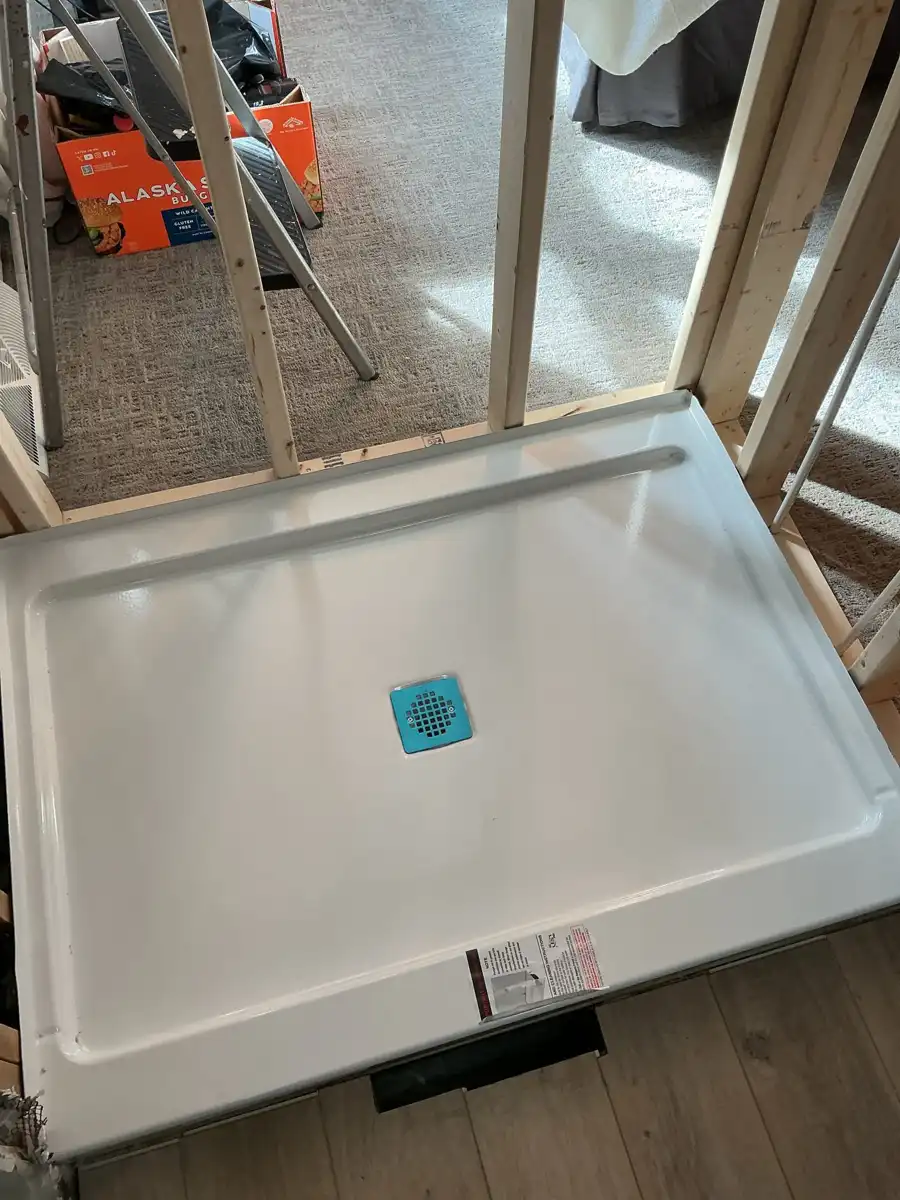
When a base is replaced, the drain is set fresh and lined up with the pipe below. This new base went in during a bathroom remodel where we also ran a new drain line for the shower. Getting the drain connection right here is what prevents the slow leaks that ruin floors years later.
On our own shower drain calls, most visits were clogs cleared through the drain without removing anything. The next most common fixes were replacing the trap under the shower and installing a new drain body, often a retrofit style that went in from above. Full shower base replacement or relocating the drain came up mainly during remodels. If you are planning one, our shower and tub installation service handles the drain, the valve and the base together.
How do I put the new shower drain in so it does not leak?
If you have gone this far, finish the job right. Most leaks we find on shower drains come from a reinstall that skipped a step.
- Clean the opening. Scrape off every bit of old putty, caulk and gasket. New sealant will not stick to old residue.
- Match the drain to the base. Bring the old drain or a photo to the store. Shower drains come in different sizes and thread types, and a near match leaks.
- Dry fit first. Thread the new drain in by hand before adding any sealant to make sure it seats fully.
- Use the right sealant. Roll a rope of plumber's putty under the flange, or use the silicone the manufacturer calls for. Do not use both unless the instructions say so.
- Tighten firmly, not hard. Hand tight plus a quarter turn with the tool is usually right. Overtightening cracks plastic drain bodies.
- Wipe off the extra sealant that squeezes out.
- Test. Plug the drain, fill an inch of water, and look underneath if you can. Then pull the plug and watch the drain while it empties.
If you are also dealing with weak water flow from the shower head itself, that is a supply side issue rather than a drain problem. Our guide on how to increase water pressure in a shower walks through it.
How do you pull out a shower drain cover with no screws?
A cover with no screws is a snap in strainer. Slide a thin flat screwdriver or a putty knife under the edge and lift gently, working around the circle in small steps. It pops free once the friction lets go. If it will not move, look for small screws hidden under soap scum, or try turning it, because some covers thread in.
Which way do you turn a shower drain to remove it?
Counterclockwise, the same as loosening a jar lid. Lock a drain removal tool into both crossbars, warm the flange with a hair dryer to soften the old sealant, and use steady pressure. If it still will not turn after heat and penetrating oil, stop before you bend the crossbars.
Can I remove a shower drain without going under the floor?
Usually yes for the strainer and for a tub drain flange. For a shower base drain, it depends on how it was connected. Compression style drains come out from above. Glued drains need access from below, or a retrofit drain that fits down inside the old pipe from the top.
What do I do if the crossbars in my tub drain broke off?
Stop turning with pliers. An internal drain extractor grips the inside walls of the drain instead of the crossbars, and it removes most broken flanges without damage. If that does not work, a plumber can cut the flange out in sections without harming the pipe underneath.
Do I need to remove the shower drain to clear a clog?
Rarely. Most shower clogs are hair caught right under the cover or in the trap below. Pull the strainer, use a plastic hair snake, and flush with hot water. If the water still backs up after that, the clog is farther down the pipe and needs a drain machine, not a new drain.
Why does my shower drain leak after I replaced it?
The most common causes are old sealant left in the opening, a new drain that does not quite match the threads, or a drain tightened so hard it cracked. A shower base that flexes when you stand on it also breaks the seal over time. Pull it, clean it fully, and reseat it, or have the base support checked.
Can I remove the drain in a tile shower?
You can remove the grate, which lifts out or is held by two small screws. The drain body itself is clamped to the waterproof liner under the tile and set in mortar. Removing it means breaking out the shower floor, so only do that as part of rebuilding the pan.
Get shower drain help in Grand Rapids
NSP Plumbing is a licensed Michigan plumbing contractor (license #8004990) serving Grand Rapids, Wyoming, Kentwood, Walker, Grandville, East Grand Rapids and the surrounding West Michigan area.
We clear slow and backed up shower drains, remove seized and broken drain flanges, replace cracked or leaking drain bodies, and set new drains during shower remodels. Clogs that sit past the trap get cleared through our drain cleaning service, and if the line keeps backing up, a camera inspection shows us what is going on inside the pipe. We feed a waterproof camera on a cable down the drain and watch the inside of the pipe on a screen, and our camera inspection service explains what we look for.
A lot of the homes we work in around Grand Rapids have showers that were added or updated over the years, sometimes on top of much older drain pipes. That mix is where we see stuck drains and slow leaks most often. A fiberglass base set over an old metal pipe joint, or a drain glued in place above a finished basement ceiling, both need the right approach the first time.
What helps us fix it on the first visit:
- Whether the shower is a tub combination, a fiberglass base, or tile.
- A photo of the drain cover, and of the pipe underneath if you can see it.
- Whether the problem is a slow drain, a leak below, a stuck drain, or a part you want replaced.
- Whether the crossbars are bent or broken, or the drain is already partly removed.
- Whether other drains in the house are slow or gurgle when the shower runs.
Those answers usually tell us which tools and parts to bring, so the visit stays short and the repair stays simple. If the problem turns out to be bigger than the drain, we show you what we found and explain the options before anything else happens.
Shower drain stuck, slow or leaking? We will get it out cleanly.
Send us a photo of the drain and tell us what is going on. A licensed NSP plumber removes the drain without damaging your shower, clears or replaces what is needed, tests it for leaks, and gives you a written price before any work starts.